Featured Post

TNTET 2017 BREAKING NEWS

TNTET 2017 BREAKING NEWS | ஆசிரியர் தகுதித்தேர்வு நடத்த அனைத்து ஏற்பாடுகளும் தயார்...ஓரிரு நாட்களில் முறையான அறிவிப்பு வெளியாகிறது...| விண்ண...

Saturday, March 29, 2014

அவசியமாகத் தேவைப்படும் இலவச புரோகிராம்கள்

புத்தம் புதிய பெர்சனல் கம்ப்யூட்டர் ஒன்றை வாங்கி, வீடு அல்லது அலுவலகத்திற்குக் கொண்டு வந்து, ஆசையுடன் அதில் தேவையான சாப்ட்வேர் புரோகிராம்களைப் பதியத் தொடங்குகிறீர்களா! இது நமக்கு மகிழ்ச்சி தரும் அனுபவமாகவே இருக்கும். நாம் விரும்பும் புரோகிராம்களை அமைத்து இயக்கலாம். அது சமையலுக்கான குறிப்புகளைத் தரும் புரோகிராமாக இருக்கலாம். வங்கி கணக்குகளைப் பராமரிக்கும் திட்டமாகவும் இருக்கலாம். ஆனால், எல்லாருக்கும் பயன்தரும் வகையில் சில புரோகிராம்கள் உள்ளன. இவற்றை அனைவருமே தங்கள் பெர்சனல் கம்ப்யூட்டர்களில் அமைத்துக் கொள்வது நல்லது.
அதுவும் அவை இலவசமாகவே கிடைக்கின்றன என்ற நிலையில், நிச்சயமாய் கம்ப்யூட்டரில் இடம் பெற வேண்டும். அவற்றை இங்கு காணலாம்.
1. பிரவுசர்: சாப்ட்வேர் புரோகிராம்களை அமைத்திட, இணையத்தை நாட வேண்டி வரலாம். அதற்கு உங்களுக்குத் தேவை ஒரு பிரவுசர். விண்டோஸ் தொகுப்புடன் வரும் இன்டர்நெட் எக்ஸ்புளோரர் இதில் உங்களுக்கு உதவலாம். இல்லை, நான் ஏற்கனவே பழகிய ஷூ தான் என் காலுக்குச் சரியாக இருக்கும் என்று எண்ணுபவராக நீங்கள் இருந்தால், உங்களுக்குப் பிடித்தமான பயர்பாக்ஸ் அல்லது குரோம் பிரவுசரை அமைத்து இயக்குங்கள்.
2. ஆண்ட்டி வைரஸ்: இணையத்துடன் தொடர்பு கொள்வதாக இருந்தாலும், யு.எஸ்.பி. ட்ரைவ் ஒன்றை இணைத்து பைல் பரிமாறிக் கொள்வதாக இருந்தாலும், உங்களுக்குத் தேவை மால்வேர்களையும் வைரஸ்களையும் கண்டறிந்து எச்சரித்து பாதுகாக்கும் ஆண்ட்டி வைரஸ் சாப்ட்வேர் தொகுப்புகளாகும். விண்டோஸ் 8 சிஸ்டத்தில் Windows Defender என்னும் ஆண்ட்டி வைரஸ் சாப்ட்வேர், மாறா நிலையில் தானாகவே பதிந்து கொண்டு, உங்கள் கம்ப்யூட்டரில் இயங்கும். ஆனால், இது வைரஸ்களுக்கு எதிரான நடவடிக்கை எடுப்பதில் அவ்வளவு சிறப்பாகச் செயல்படவில்லை என்பது பலரின் குற்றச்சாட்டு. எனவே, மூன்றாவது நிலை நிறுவனங்களின் இலவச ஆண்ட்டி வைரஸ் சாப்ட்வேர் தொகுப்புகளை, இறக்கிப் பதிந்து அப்டேட் செய்து கொள்ளுங்கள். இந்த வகையில், இலவசமாகக் கிடைக்கும் ஏவிஜி ஆண்ட்டி வைரஸ் தொகுப்பு சிறப்பான வகையில் செயல்படுவதாகக் கண்டறியப்பட்டுள்ளது. Avast Antivirus Free புரோகிராமும் இதே போல செயல்படுகிறது. எனவே இதனையும் பயன்படுத்தலாம். இதே போல, மால்வேர் புரோகிராம்களுக்கு எதிரான பாதுகாப்பினைத் தருவதாக, Malwarebytes AntiMalware Free என்ற புரோகிராம் கண்டறியப்பட்டுள்ளது. இந்த புரோகிராம், புதிய மால்வேர்கள் இயங்கியத் தொடங்கிய முதல் நாளே அதனைக் கண்டறிந்து தடுக்கும் வகையில் வடிவமைக்கப்பட்டுள்ளது. பொதுவாக, ஆண்ட்டி வைரஸ் அல்லது மால்வேர் புரோகிராம்களில் ஒரு புரோகிராம் மட்டுமே முழுமையான பாதுகாப்பினைத் தராது. ஆனால், ஒரே நேரத்தில் இரண்டு ஆண்ட்டி வைரஸ் புரோகிராம்களை இயக்கக் கூடாது. எனவே, ஒன்றுக்கு மேற்பட்ட புரோகிராம்களைப் பதிந்து வைத்து, ஒன்றை நிறுத்தி இன்னொன்றை இயக்கி நம் கம்ப்யூட்டரைப் பாதுகாக்கலாம். இவற்றைப் பெற avast.en.softonic.com/download?// free.avg.com/inen/download என்ற முகவரிகளில் உள்ள இணைய தளங்களை நாடவும்.
3. தேவையற்ற சாப்ட்வேர் நீக்கி (PC Decrapifier): நம் பெர்சனல் கம்ப்யூட்டரை நமக்கு விற்பனை செய்திடும் நிறுவனம், நமக்கு உதவுவதாகக் கூறி, பல புரோகிராம்களை, தேவை இல்லாமலேயே பதிந்து அனுப்பும். இவற்றை bloatware என அழைக்கின்றனர். இவற்றை நாம் எப்படி அறிந்து நீக்குவது? இதனை அறிந்து நமக்குப் பட்டியலிட, நமக்குக் கிடைக்கும் புரோகிராம் PC Decrapifier. இந்த சிறிய புரோகிராமினை இன்ஸ்டால் செய்து இயக்கினால், நம் கம்ப்யூட்டரில் உள்ள தேவையற்ற புரோகிராம்கள் அனைத்தையும் பட்டியலிடும். பின்னர், நாமாக, தேவையற்றதை நீக்கிவிடலாம்.
4. வழி திறக்கும் Unlocker: புரோகிராம் ஒன்றை தேவையற்றது எனக் கருதி, அதனை அன் இன்ஸ்டால் செய்திட முயன்றால், நீக்கிட முயற்சி எடுத்தால், விண்டோஸ், இதற்கு ""உனக்கு அனுமதி இல்லை, புரோகிராம் பயன்பாட்டில் உள்ளது” என நமக்குத் தடை போடலாம். அந்நிலையில் என்ன செய்வது? இந்த வகையில் உதவிட நமக்குக் கிடைக்கும் புரோகிராம் Unlocker.. இதனை இயக்கினால், மறுக்கும் புரோகிராமினை வெட்டிச் சாய்க்கும் வகையில் உங்கள் முன் நிறுத்தும். பின் எளிதாக நீக்கிவிடலாம். இதனைப் பெற pcdecrapifier.com/download என்ற இணைய தளம் செல்லவும்.
5. மீட்டெடுக்கும் ரெகுவா (Recuva): சில வேளைகளில் நமக்குத் தேவைப்படும் பைல்கள் அல்லது புரோகிராம்களை, அவசரப்பட்டு நீக்கிவிடுவோம். அதன் பின்னர், கைகளைப் பிசைந்து கொண்டு கம்ப்யூட்டர் ஸ்கிரீனை முறைப்போம். இந்தச் சூழ்நிலையில் நமக்கு உதவும் புரோகிராம் ரெகுவா. அழித்த பைல்களை மீட்டெடுக்கும் புரோகிராம். இதனை இயக்கினால், அழித்த புரோகிராம்களில் எவற்றை மீட்டெடுக்கலாம் எனப் பட்டியல் தந்து நம் விருப்பப்படி அவற்றை மீட்டுத் தரும். ஆனால், "file shredder” போன்ற டூல்களால், பைல்கள் அழிக்கப்பட்டிருந்தால், ரெகுவா மீட்டெடுக்காது. Piriform நிறுவனம் இதனை இலவசமாக வழங்குகிறது. இந்த புரோகிராமினை இலவசமாகப் பெற நீங்கள் செல்ல வேண்டிய இணைய தளம் recuva.en.softonic.com
6. சிகிளீனர் (CCleaner): Piriform நிறுவனம் வழங்கும் இன்னொரு இணையற்ற உதவிடும் புரோகிராம் சிகிளீனர். நம் பெர்சனல் கம்ப்யூட்டரில் சேரும் குப்பைகளை நீக்கி, மிக அழகாக வைத்திடும் புரோகிராம். தற்காலிக பைல்கள், தேவையற்ற குக்கீகள், ஹிஸ்டரி பைல்கள், ரெஜிஸ்ட்ரியில் தங்கும் குறியீடு வரிகள் என அனைத்தையும் நீக்கும். புரோகிராம்களை அன் இன்ஸ்டால் செய்வதிலும் இது உதவும். எந்தவிதமான மிச்சம் மீதி துணை பைல்கள் எதுவும் தங்கவிடாமல், புரோகிராம்களை அன் இன்ஸ்டால் செய்திடும். இதுவும் இலவசமே. கூடுதல் வசதிகளுடன் கூடிய சிகிளீனர், புரோகிராமினைக் கட்டணம் செலுத்திப் பெறலாம். இந்த புரோகிராமினை http://www.piriform.com/ என்ற இணைய தளம் சென்று டவுண்லோட் செய்து கொள்ளலாம்.

7. சாப்ட்வேர் இன்ஸ்பெக்டர் (Secunia PSI Personal Software Inspector): எந்த காவல் துறை புரோகிராம் என எண்ணுகிறீர்களா? நீங்கள் பயன்படுத்தும் பயன்பாட்டு சாப்ட்வேர் புரோகிராம்கள் அனைத்தும், அவ்வப்போது அப்டேட் செய்யப்பட்டு இயக்கப்பட வேண்டும். இல்லையேல், இடையே கிடைக்கும் இடைவெளியில், மால்வேர் அல்லது வைரஸ் புரோகிராம்கள் புகுந்து, உங்கள் கம்ப்யூட்டரை உங்கள் கட்டுப்பாட்டிலிருந்து கொண்டு சென்றுவிடும். உங்களின் புரோகிராம்கள் அவ்வப்போது அப்டேட் செய்யப்படுகின்றனவா என்ற கண்காணிப்பை மேற்கொள்ளும் பணியினை செகுனியா பி.எஸ்.ஐ. புரோகிராம் மேற்கொள்கிறது. இது கம்ப்யூட்டர் இயங்கும்போது, அமைதியாக பின்னணியில் இயங்கும். உங்கள் சாப்ட்வேர் தொகுப்புகளுக்கான பேட்ச் பைல்களைப் பெற்று, அவற்றை அப்டேட் செய்திடும். இயலவில்லை என்றால், இது போல பேட்ச் பைல் உள்ளது, நீங்களாக அப்டேட் செய்திடுங்கள் என்று எச்சரிக்கை செய்தி தரும். உங்கள் பெர்சனல் கம்ப்யூட்டரை என்றைக்கும் அப்டேட்டாக வைத்திருக்க இந்த இன்ஸ்பெக்டர் உதவும். secunia.com/products/consumer/ psi/? என்ற தளம் சென்றால், இதனைப் பெறலாம்.

Cost of Goods Sold

Cost of goods sold includes total cost of opening stock and purchase . If company has incurred some expenses on purchasing of goods then these expenses are also included in purchasing goods cost . If there is any closing stock , we can simply deduct from above total cost . After this , we can get the cost of goods sold . This amount is very important because without this , we can not calculate gross profit and net profit of business .

Formula for calculating cost of goods sold 

Cost of goods sold = Opening stock + Net purchase + Direct expenses - closing stock

  1. In opening stock , we will include all items which are not sold in the end of previous year .
  2. For calculating net purchase , we will deduct purchase return from total purchase .
  3. Direct expense will add for finding the cost of goods sold . All expenses which are paid or payable for purchasing of goods are called direct expenses .
  4. Closing stock will deduct for calculating cost of goods sold . In closing stock , we include all stock items which are not sold up to the end of the financial year . Cost of goods sold's other name is also merchandise cost because in commerce , it is very famous cost which is taught in basic accounting fundamentals .

How to Calculate Cost of Lost Inventory

If we want to improve our working capital through proper management of inventory from its buying to sale, we have to decrease the cost of lost inventory. There are lots of reasons of lost inventory like stolen by employees or misplace. So, correct calculation will help to take step to prevent all these reasons.

So, for accountants, to calculate the cost of lost inventory is must. Following is the simple formula for all who even who  know whole basic accounting.


For example : A company has inventory of $ 50,000 on 31st March as per our accounting record which shows our accounting software. But when we count our inventory through physical counting, we found the inventory of $ 40,000. It means, we have the inventory lost of $ 10,000. Now, we have the issue of lost inventory. This issue may be due to missing, misplace or stealing. So, we can make the protocol to finding the reasons of lost inventory. 

Above is simple formula but there is also alternative for calculating the lost inventory. 

 Actual Cost of Goods Sold  - (Cost of Opening  Inventory as per physical counting + Cost Purchase as per physical counting) = Actual Closing Inventory as per physical counting

Now, Find the closing stock as per record. Difference in the actual and recorded closing stock is the inventory lost. 

* Important = Actual cost of goods sold can be calculated 

actual sale - actual gross profit

Non current Assets Examples

If you study the balance sheet's asset side, you find two type of assets. One is current assets and other is non current. All assets which are not current, will be non-current assets. We take benefits of these assets more than one year. Following are its main examples.

1. Fixed Assets 

All fixed assets are non-current assets. For example, land, building, furniture, plant, equipment, vehicles etc.

2. Intangible Assets 

All intangible assets are also non-current assets. For example, goodwill, patent, copyright, trademark and other rights for more than one year.

3. Long Term Investment 

Long term investment will also be non-current asset because it will liquidate after one year. When we will sell it, we can its benefit. It may be profit or loss.

4. FD in Bank

If we deposited money at bank for more than one year in the form of FD, this will be our non-current asset.

5. Other Fixed Deposits 

If we deposited our money in long term projects like Kisan Vikas patra or other Govt. schemes. All will be non-current assets. 

Current Liabilities Examples

Current liabilities are the part of total liabilities. If you will forget it from calculating of total liabilities, you will do biggest mistake. Still, these are the small than long term liabilities but still it has the power to liquidate the company. So, you should learn all the current liabilities through knowing its examples.

Following are the main examples of current liabilities.


1st Example : We have taken goods from Sham of Rs. 10,000 on credit. We have taken goods from Ram of Rs. 15,000 on credit. We have taken goods from Mohan of Rs. 20,000. When we make its total, it will be sundry creditors.

Current liability = Sundry Creditors = 10,000 +15,000+20,000 = 45000

2nd Example : We have written the bill on the Mohan. Mohan has to pay the bill within 3 months.

Current Liability = Sundry Creditor + Bill Payable = (45000 -20,000) + 20,000 =45000

3rd Example : We have to pay the salary to 20 employees on their due date but we did not pay on due date. Amount of Salary is Rs. 50,000

Current Liability = Sundry creditors + bill payable + salary outstanding = 25000+20000+50000 =95000

4th Example : We have to pay insurance bill of Rs. 5000 on due date. We have to pay electricity and his penalty on due date of Rs. 20,000. We have to pay other expenses on due date but we did not pay of Rs. 1,00,000.

Current Liability = Sundry creditors + bill payable + salary outstanding + outstanding insurance + outstanding electricity expenses + other outstanding expenses = 25000+20000+50000 + 5000+20000+100000 =220000

5th Example : Our advance commission received on sale = Rs. 30000

Current liability = 220000 +30000 = 250,000

6th Example : SBI bank overdraft = Rs. 50,000


Current liability = 250,000+50,000 = 3,00,000

7th Example : We have taken short term loan from Sohan of Rs. 20,000

Current liability =  3,00,000 +20000 = 320,000

8th Example : We have to pay our company's income tax of Rs. 40,000. But not paid on due date.

Current liability = 320,000 +40,000 = 360000

9th Example : We have created 10% provision on our debtors. Our this year provision is Rs. 60000

Current liability =  360000 + 60,000 = 420,000

10th Example : We have taken HDFC credit card debt of Rs. 50,000

Current liability = 420,000 + 50,000 = 470,000

11th Example : We have collected TDS of Rs. 1,00,000 from employees but not paid in government account.

Current liability = 470,000 +1,00,000 = 5,70,000

12th Example : We have collected VAT from our customer of Rs. 2,00,000 and not deposited in Govt. account.

Current liability =  5,70,000 + 2,00,000 = 7,00,000

How to Make PAN Card Online in India

To make PAN card is necessary for doing large amount financial transactions. For example, if you have to make Rs.50,000 FD in your bank account, you need to show your PAN card number. Except this, there are lots of other benefits of PAN card. So, every Indian should make it.

Here, we will explain the simple steps of making PAN Card online. PAN means permanent account number. Income tax department will issue a card where you will get PAN. 


For getting this online, you have to follow following steps.


1st Step’s Part 1: Choose and Fill Best Online Form for Making PAN Card Online

For making PAN card online in India, you need to choose and fill best online form. Athttps://tin.tin.nsdl.com/pan/ , there are lots of forms of PAN, you have to choose one of best. If you are Indian citizen and making PAN card first time, you need to fill form 49 A. If you are NRI or foreign citizen, you need to fill form 49AA. There is also form for changing in your present PAN card. When you will choose form 49A, you have to select your personality. You may be individual or firm or company or trust. Select anyone given option and click select. As per your personality, you will see the form 49A online. Fill the correct information in it.


1st Step’s Part 2: Deposit the Fees of PAN Card Making Fees

You just go to bank and deposit PAN card making fees of Rs. 105 and then choose net banking in your form 49A. You can choose other option if you pay fees through bank draft or cheque or debit or credit card. You just mention the bank draft or cheque number and date. No need to show this detail in debit or credit card.


2nd Step : Print Acknowledgement after Saving Online Application

It is your duty to print acknowledgement after submitting and saving online pan application

3rd Step :  Affix two recent colour photographs with white background (size 3.5 cm x 2.5 cm)


In third step, you need to affix two recent colour photographs with white background (size 3.5 cm x 2.5 cm). in the space provided in the acknowledgement. The photographs should not be stapled or clipped to the acknowledgement.  


4th Step : Signature / Left Thumb Impression should only be within the box provided in the acknowledgement

Signature is necessary for your physical declaration of correctness of information which you have provided in online form.


5th Step : Send acknowledgement plus important document to  Income Tax PAN Services Unit

You have to send this acknowledgement plus following important documents to income tax PAN services unit address “'Income Tax PAN Services Unit, NSDL e-Governance Infrastructure Limited, 5th floor, Mantri Sterling, Plot No. 341, Survey No. 997/8, Model Colony, Near Deep Bungalow Chowk, Pune – 411016” by writing on the envelope with 'APPLICATION FOR PAN - Acknowledgement Number' (e.g. 'APPLICATION FOR PAN - 881010100000097').

Attached documents

  •      ID Proof photocopy
  •       Address proof photocopy
  •       Date of birth proof photocopy
  •     Original demand draft or cheque


After following above steps, you will get PAN card in your address within 15 to 20 days. 

Why is China Buying US Treasuries

There is big master plan of Chinese central bank for buying US treasuries. One side china wants to earn the the interest on his bought US treasuries and second its effect will on its products cost. These products will become cheap. How is it possible?

We know that Chinese central bank buys dollar by printing new yuan every year. These US dollars are bought in the international forex market. Demand of dollar will increase. Now, US central bank will get debt from Forex market by issuing US treasuries. Same USA treasuries will be bought by Chinese central bank. Because of printing cost of yuan is so cheap in china. China will be in profit. Now, debt received through US treasuries will be given in the market.

Now, again, US people will have money because they will get loan from the fund of US treasuries at cheap rate of interest. USA central bank will have enough money. So, there is no reason to increase the interest on loan for USA people.  Now, USA people  have to decide how to consume this money. They will buy china's products because with one dollar, they can buy more products from china because china is on the policy of keeping lower his currency and make addicted USA people for his Chinese products. Still, china on this policy. When china will see all USA have become the addicted on the Chinese products. It leave the policies of buying US treasuries. In future, US will ready to buy Chinese product at high cost also because they will become addicted Chinese products.

You can study above text in following phonographic presentation.


எக்ஸெல் ஸ்பெல் செக்கர்


அநேகமாக நாம் அனைவரும் வேர்ட் புரோகிராம் தரும் ஸ்பெல் செக்கரைத்தான் பயன்படுத்தி வருகிறோம். சிலர் அதில் மட்டுமே ஸ்பெல் செக்கர் இருப்பதாக எண்ணிக் கொண்டு வருகின்றனர். வேர்ட் போலவே, எக்ஸெல் தொகுப்பிலும் ஸ்பெல் செக்கர் உள்ளது. மற்ற ஆபீஸ் அப்ளிகேஷன்களில் இதனை இயக்குவது போல, இதிலும் இயக்கலாம்.
1. எழுத்துப் பிழை அறிய விரும்பும் ஒர்க்ஷீட் அல்லது ஒர்க்ஷீட்களைத் தேர்ந்தெடுக்கவும்.
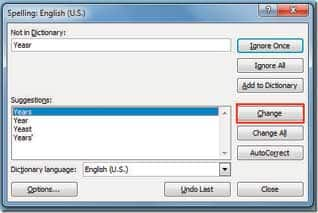
2. Tools மெனு சென்று Spelling என்பதனைத் தேர்ந்தெடுக்கவும். அல்லது F7 கீ அழுத்தவும். எக்ஸெல் உங்கள் ஒர்க் ஷீட்டினை ஸ்பெல் செக் செய்திடத் தொடங்கும். ஸ்பெல்லிங் டயலாக் பாக்ஸ் காட்டப்பட்டு அதில், ஸ்பெல் செக்கர், பிழை என எண்ணும் இடங்கள் எல்லாம் காட்டப்படும். இதில் காட்டப்படும் spelling suggestions குறித்து நீங்கள் உங்கள் முடிவை அமல்படுத்தலாம்.
ஸ்பெல் செக்கரை ஒர்க் ஷீட் முழுவதும் மேற்கொள்ளாமல், சில செல்களில் மட்டும் கூட மேற்கொள்ளலாம். இதற்கு,
1. எந்த செல்களில் சோதனை மேற்கொள்ள வேண்டுமோ, அந்த செல்களைத் தேர்ந்தெடுக்கவும்.
2. வழக்கம் போல Tools மெனு சென்று Spelling என்பதனைத் தேர்ந்தெடுக்கவும். அல்லது F7 கீ அழுத்தவும். இங்கும் காட்டப்படும் தவறுகளுக்கு உங்கள் கணிப்புப்படி முடிவெடுத்துச் செயல்படவும்.
நீங்கள் தேர்ந்தெடுத்த செல்களில் ஸ்பெல் செக் முடிந்த பின்னர், எக்ஸெல், உங்கள் ஒர்க்ஷீட்டின் மீதப் பகுதியும் சோதனை செய்திடவா? என்று கேட்கும். விருப்பமிருந்தால் தொடரலாம். அல்லது No கிளிக் செய்து, ஸ்பெல் செக்கிங் சோதனையை முடிக்கலாம்.

Generating e-CST Waybill or e-VAT Waybill for AP State VAT Dealers

As a VAT Dealer from Andhra Pradesh State you have direct permission to obtain the CST Waybill, or VAT Waybill from the AP Commercial Taxes Department website through online process. The Department has make it available through the Dealer Login portal.
Image: Generating Online CST Waybill or VAT Waybill from AP State VAT Dealers
  1. Login to your VAT Dealer Account with your 11 digit TIN number and password.
  2. After you have logged into your account just select the e-WAYBILL/C, F FORMS menu form the MenuBar on top of the screen.
  3. You will be seeing the few Sub-Menus under it just select the CREATE E WAYBILL/C, F FORMS Sub-Menu.
  4. Then you will be navigated to the Dealer Profile page where you will be doing the process. In this page select either CST Waybill radio button or VAT Waybill ratio button, that which you want to generate.
  5. Then you have to choose either Invoice count Less than or equal to 5 or Invoice count More than 5 radio buttons.
  6. Later you have to provide the Way Bill details like Dealer TIN Number, Invoice Number, Quantity, Value etc., in the VAT or CST Way Bill Details page.
  7. Then select Add Invoice button and you will be seeing the details of the Way Bill at the bottom after clicking the Add Invoice button.
  8. And verify the details once again and click on Generate Waybill button to complete the process.
After you have generated the Way Bill either it is CST or VAT Waybill you have to take the print out of the bill from Re Print Form 

Printing e-Waybill or e-Statutory Forms for AP VAT Dealers

After you have generated either the CST Waybill, VAT Waybill, C Form, F Form, or H Form through the Online Generation Processyou have to take the Print Out of the same using the Re-Print Form page from the Andhra Pradesh Commercial Taxes Department website.
Image: Printing Online Waybill or Statutory Forms for AP VAT Dealers
  1. Once again login to your VAT Dealer Account with your 11 digit TIN number and password.
  2. After you have logged into your account just select the e-WAYBILL/C, FORMS menu form the MenuBar on top of the screen.
  3. You will be seeing the number of Sub-Menus under it just select the REPRINT FORM Sub-Menu.
  4. Then you will be navigated to the Re Print Form page where you will be getting the print out of the Waybill or Form.
  5. For the Form Type drop down box select the required Waybill or Form type that you want to take printout that you earlier generated.
  6. Leave the Form No and provide the From Date and To Date range when you have generated the Forms or Waybills.
  7. Then you will be seeing the number of Waybills or Forms generated during the period. To print that just click on the corresponding Form No and take the print out.

Electricity Bill payment using ATM Card through SBI website

The electricity bill payment can be done through State Bank of India Official website. And this is the one of the features provided by the SBI. From the OnlineSBI website you can pay all most all the utility bills, Mobile, or DTH Recharge and so on. After you have opened the website you can find the SBI-InstaPay / SBI-OxiPay link, open it. And the rest of the process goes here.
Image: Electricity Bill payment using ATM Card through SBI website
  1. In a SBI-InstaPay / SBI-OxiPay page you can find the following two sections
    • SBI-OxiPay (via Oxigen)
    • SBI-InstaPay (via BillDesk)
  2. Just go with the SBI-InstaPay section. There you can find an hyperlink just click the link then a Disclaimer will be display below just click on Accept button.
  3. Then you will be navigated to the BillDesk page there you have to select the Utilities Payment radio button and beside the radio button select APCPDCL Andhra Pradesh from the dropdown box and click on submit button at the bottom.
  4. And set your District, ERO and SC or Unique Service Number, Payment option and click on submit button.
  5. In the BillDesk Payment Gateway page provide your Card Details and type the words exactly in the textbox seen in the image and click on Make Payment button.
  6. Then you will be navigated to your Bank site for authorizing the transaction there you need to enter your password of your Verified by Visa account and click on Submit button.
Then your payment will made by debiting your Bank Account and Receipt page will be opened just note down the Reference Number or take a printing out of the receipt.

How to register in Income Tax e-Filing website?

Income Tax Return filing through offline mode is outdated and eFiling made the Returns faster, easier and smoother. You can Register in the IncomeTaxIndiaeFiling.gov.in website for your Returns e-Filing. So before you proceed to register in the e-Filing website of Income Tax Department you must keep with you all your basic details, address along with your PAN Card number. And here the process goes.
Image: How to register in Income Tax e-Filing website?
  1. Open the Income Tax India e-Filing website and click on the Register Yourself button or like similar link.
  2. In the Registration Form select a radio button based on the type of returns you file for the Assessee. For single person returns select Individual radio button under Individual/HUF section and click on continue button.
  3. In the first step of the Registration process you need to provide your Basic Details like PAN number, Surname, Middle and Last names, Date of Birth, email id, and Mobile number of the Assessee and click on the Continue button.
  4. In the second step you must provide the following details to login to your e-Filing Account
    • Create a password.
    • Choose two security questions and provide answers for them.
    • And finally provide the contact details and Personal Address and Permanent Address.
    • At last in Captcha Code section you find an image having some words or numbers just type them as it is in the box provided.
    • And click on button to finish the registration process.
At the end you can see the Registration Successful message along with your email id and phone number details in the message. And a message will be sent to your eMail Id to activate your Account in efiling website. Login to your eMail account, open the message received from DONOTREPLY@incometaxindia.gov.in click on the Activation link in the message, which will take you to the e-Filing website. Just click on the Login link to start your e-Filing.

நெவர் க்வெஸ்ட் வைரஸ்: காஸ்பெர்ஸ்கி எச்சரிக்கை


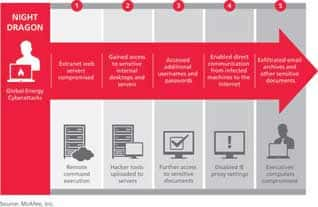
ஆண்ட்டி வைரஸ் தொகுப்பு தயாரிப்பில் முதல் இடத்தில் இயங்கி வரும் ரஷ்ய நிறுவனமான, காஸ்பெர்ஸ்கி லேப், இணையத்தில் இயங்கும் வங்கிகளின் தளங்களைத் தாக்கிவரும் ""நெவர் க்வெஸ்ட்” வைரஸ் குறித்து கடுமையான எச்சரிக்கையை வழங்கியுள்ளது. வங்கி கணக்குகளைப் பராமரிக்கப் பயன்படுத்தப்படும் ஆயிரக்கணக்கான கம்ப்யூட்டர்களை இந்த வைரஸ் பற்றிக் கொள்ளவும், ஊடுறுவவும் முயற்சித்ததாக, காஸ்பெர்ஸ்கி லேப் அறிவித்துள்ளது.
இந்த வைரஸ் எந்த நாட்டிலும், எந்த வங்கியின் தளத்தையும் கைப்பற்ற வடிவமைக்கப்பட்டுள்ளது. ஆன்லைன் வங்கி பாதுகாப்பு சிஸ்டத்தின் அனைத்து பாதுகாப்பு வழிகளையும் இது சந்திக்கிறது. அவற்றில் web injection, remote system access, மற்றும் social engineering ஆகியவை அடங்கும்.
கம்ப்யூட்டர்களைக் கைப்பற்றுவது மட்டுமின்றி, தன்னைத்தானே பெருக்கிக் கொள்ளும் தன்மையும் கொண்டதாக இந்த நெவர்க்வெஸ்ட் வைரஸ் உள்ளது. இதனால், உலக அளவில், இது தாக்கிய கம்ப்யூட்டர்களின் எண்ணிக்கை விரைவில் வேகமாக உயரும் வாய்ப்பு உள்ளதாக காஸ்பெர்ஸ்கி அறிவித்துள்ளது. இந்த வைரஸ் தாக்கும் பட்சத்தில், வங்கிகளின் வாடிக்கையாளர்களுக்கு மட்டுமின்றி, வங்கிகளுக்கும் நிதி இழப்பு ஏற்படலாம்.
விடுமுறை நாட்களில் இது வேகமாக இயங்கி கம்ப்யூட்டர்களைத் தாக்கும் வகையில் அமைக்கப்பட்டுள்ளதாக அறிவிக்கப்
பட்டுள்ளது. இந்த வைரஸ் மூலம் திருடப்பட்ட பணம் எந்த அக்கவுண்ட்களில் சேர்க்கப்படுகின்றன என்று விழிப்பாக இருந்து கவனிக்க வேண்டும் எனவும் அறிவுறுத்தப்பட்டுள்ளது.
நெவர் க்வெஸ்ட், வங்கிகளின் கணக்கு வைத்து ஆன்லைன் செயல்பாட்டினை மேற்கொள்ளும் வாடிக்கையாளர்களின் யூசர் நேம் மற்றும் பாஸ்வேர்ட்களைத் திருடுகிறது. வாடிக்கையாளர்கள், வங்கிகளின் இணைய தளத்தில் அமைக்கும் தகவல்களையும் திருடுகிறது. இந்த வைரஸ் இயங்க, இன்டர்நெட் எக்ஸ்புளோரர் மற்றும் பயர்பாக்ஸ் பிரவுசர்களுக்கென தனிக் குறியீடுகள் அமைக்கப்பட்டுள்ளதாகக் கண்டறியப்பட்டுள்ளது. யூசர் நேம் மற்றும் பாஸ்வேர்ட்களைக் கண்டறிந்த பின்னர், நெவர் க்வெஸ்ட் வைரஸைக் கையாளும் ஹேக்கர்கள், தங்கள் அக்கவுண்ட்களுக்குப் பணத்தை மாற்றுகின்றனர். வரும் மாதங்களில், இந்த நடவடிக்கை பல நாடுகளுக்குப் பரவும் அபாயம் உள்ளதாகவும், காஸ்பெர்ஸ்கி அறிவித்துள்ளது.

How to Open, Work, and Quit Tally.EPR 9 Accounting Software?

This is the ending point in Getting Started with Tally.ERP 9 section and the starting point for the Working with Tally.ERP 9 section. Till now we have read about Tally.ERP 9 Application Software its history, features, elements, installation process. And it’s time to start recording accounting in Tally.ERP 9.
Image: How to open, work with, and close Tally.EPR 9 Accounting Software?

Open or Launch Tally.ERP 9

In order to start working with Tally.ERP 9, we have to launch the application nothing but opening it. After you have Installed Tally.ERP 9 in your computer you can find the Tally.ERP 9 Icon on your computer Desktop. Just keep the cursor over it and double click the left mouse button.
As soon as you double click the icon on the desktop, Tally.ERP 9 application software will be opened with a flashing screen of the Company Logo. We have introduced about the interface elements of the Application Software in the earlier section.

Functioning with Standard Input and Output Devices

It is similar to a normal Windows Application Software and we can work using both the Mouse and Keyboards. The functioning of the mouse will be different in Main Area than the other elements of the screen. Go through the Introduction to Tally.ERP 9 Interface part to better understand this section.

Using Mouse in Main Area

  1. Press and release the left mouse button by keeping the pointer on an item, to choose the item.
  2. Position the mouse pointer on an item and double-click the left mouse button, to select the item.

Using Keyboard in Main Area

  1. Use the Up or Down Keys to move from one item to another item.
  2. Press Bold Format Styled Character used in an item from your keyboard to select the item.

Using Keyboard in Button Areas

In Horizontal Button Area and Button Toolbar elements we can use the Mouse as usually but come to the Keyboard shortcut keys we can use the with the help of Alt and Ctrl key along with the starting character.
  • To select a button located on either of the button areas you need to press the starting character or a function key by holding the Alt key if the starting character is in single underline otherwise you need to hold the Ctrl key if the starting character is in double underline.

Quit Tally.ERP 9

You can close the Tally.ERP 9 accounting software by selecting the Quit option available in any one of the Menu screens in the Main Area, or reach the Gateway of Tally screen and press Esc Key in your keyboard and select the Yes option.

எவ்வளவு நேரம் என் கம்ப்யூட்டர் இயங்கியது?

சிலர் தங்களுடைய கம்ப்யூட்டர் எவ்வளவு நேரமாய் இயங்கிக் கொண்டிருந்தது என்று அறிய ஆசைப்படுவார்கள். கம்ப்யூட்டரை வாடகைக்குப் பயன்படுத்தக் கொடுப்பவர்களுக்கும் இந்தத் தேவை ஏற்படும். இதனை அறிந்து கொள்ளச் சில வழிகள் உள்ளன. அவற்றைக் காணலாம்.
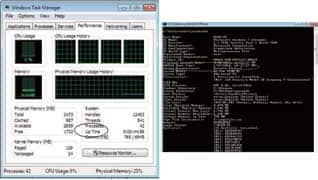
1. முதல் வழி: டாஸ்க் மானேஜர் (Task Manager) வழியாக: டாஸ்க் பாரில் ரைட் கிளிக் செய்திடவும். இதில் Task Manager என்பதில் கிளிக் செய்திடவும். இந்த விண்டோவில், Performance என்னும் டேப்பினைத் தேர்ந்தெடுக்கவும். பின்னர் இகக் என்பதனைத் தேர்ந்தெடுக்கவும். இதில் வலதுபக்கமாக uptime என்று ஒரு வரி காட்டப்பட்டு, அதில் இறுதியாகப் பூட் செய்யப்பட்ட நேரத்திலிருந்து இது வரை எவ்வளவு நேரம் என்பது
காட்டப்படும்.
2. இரண்டாம் வழி: கட்டளைப் புள்ளியிலிருந்து (Command Line): இன்னும் பலர் டாஸ் அமைப்பின் கட்டளைப் புள்ளியில் கட்டளை கொடுத்து, தமக்கு வேண்டியதைப் பெறுவதை விரும்புகின்றனர். இது அவர்களுக்காக — Win+R என்ற கீகளை அழுத்தவும். கிடைக்கும் ரன் விண்டோவில் cmd என டைப் செய்திடவும். பின்னர் கிடைக்கும் விண்டோவில் "systeminfo” என டைப் செய்து எண்டர் தட்டவும். இங்கு இதனை ஒரே கட்டளைச் சொல்லாக டைப் செய்திட வேண்டும். இடையே ஸ்பேஸ் விடக்கூடாது.
ஒரு பெரிய நீளமான விண்டோ கிடைக்கும். இதில் ஸ்குரோல் செய்து சென்று, System Boot Time என்ற வரி எங்கு உள்ளது எனக் காணவும். இது கம்ப்யூட்டர் எப்போது பூட் ஆனது என்பதனைக் காட்டும். இதிலிருந்து, தற்போதைய நேரத்தைக் கணக்கிட்டு, எவ்வளவு நேரமாகக் கம்ப்யூட்டர் இயங்கிக் கொண்டிருக்கிறது என்பதை அறியலாம்.

எக்ஸெல் டிப்ஸ்

எக்ஸெல் தனிக் குறிப்புகள்: தேர்ந்தெடுக்கப்பட்ட பார்முலாவிற்கு எந்த செல்கள் எல்லாம் தொடர்பு உள்ளது என்று அறிய CTRL+[ அழுத்தவும்.
Ctrl+] கீகளை அழுத்தினால் எந்த செல்லில் கர்சர் இருக்கிறதோ அந்த செல் சம்பந்தப்பட்ட பார்முலாக்கள் காட்டப்படும்.
ஷிப்ட் + ஆரோ கீ (Shft+Arrow key) அழுத்தினால் செல்கள் தேர்ந்தெடுக்கப்படுவது ஒரு செல்லுக்கு நீட்டிக்கப்படும்.
கண்ட்ரோல் + ஷிப்ட் + ஆரோ கீ (Ctrl+Shft+ Arrow key) அழுத்தினால் அதே படுக்கை அல்லது நெட்டு வரிசையில் டேட்டா இருக்கும் கடைசி செல் வரை செலக்ஷன் நீட்டிக்கப்படும்.
ஷிப்ட் + ஹோம் கீகள் (Shft+Home) அழுத்தப்படுகையில் படுக்கை வரிசையின் முதல் செல் வரை செலக்ஷன் நீட்டிக்கப்படும்.
கண்ட்ரோல்+ஷிப்ட்+ ஹோம் (Ctrl+Shft+ Home) கீகள் அழுத்தப்படுகையில் செலக்ஷன் ஒர்க் ஷீட்டின் முதல் செல் வரை நீட்டிக்கப்படும்.
கண்ட்ரோல்+ஷிப்ட் + எண்ட் (Ctrl+Shft+ End) கீகள் அழுத்தப்படுகையில் செலக்ஷன் ஒர்க்ஷீட்டில் கடைசியாகப் பயன்படுத்தப்பட்ட செல் வரையில் நீட்டிக்கப்படும்.

எக்ஸெல் ஒர்க்ஷீட்டில் என்டர் கீ: எக்ஸெல் தொகுப்பில் என்டர் கீ அழுத்தினால், வழக்கத்திற்கு மாறான செயல்பாடு மேற்கொள்ளப்படுவதனைக் காணலாம். செல் ஒன்றில் டேட்டாவினை அமைத்துவிட்டு, என்டர் கீ அழுத்தினால், அந்த டேட்டாவினை செல்லில் அமைத்த கையோடு, கர்சர் அதே நெட்டு வரிசையில் கீழே உள்ள செல்லுக்குச் செல்லும். இவ்வாறு இல்லாமல், என்டர் கீ அழுத்துவதன் மூலமாக மேற்கொள்ளப்படும் பணியினை நீங்கள் விரும்பும் வகையில் மேற்கொள்ளுமாறு செய்திடலாம்.
பொதுவாக செல் ஒன்றில் டேட்டாவினை என்டர் செய்தவுடன், என்டர் கீயினை அழுத்துவது வழக்கமான வேலையாகும். அவ்வாறு செய்திடுகையில் உங்கள் விருப்பப்படி என்டர் கீக்கான பணியை நிர்ணயம் செய்திடலாம். ஒன்றுமே நடக்காத படி செய்திடலாம். அல்லது கீழே உள்ள செல்லுக்குக் கர்சர் செல்லாமல், பக்கத்தில் உள்ள செல்லுக்குச் செல்லும்படி அமைத்திடலாம். இதற்கான வழிகள்:
1. டூல்ஸ் மெனு சென்று ஆப்ஷன்ஸ் பிரிவைத் தேர்ந்தெடுக்கவும். எக்ஸெல் ஆப்ஷன் டயலாக் பாக்ஸினைத் தரும்.
2. இதில் உள்ள டேப்களில் எடிட் டேப்பினைத் தேர்ந்தெடுக்கவும்.
3. Move Selection After Enter என்ற வரி அருகே உள்ள செக் பாக்ஸைக் காணவும். என்டர் அழுத்திய பிறகு கர்சர் எங்கும் செல்லக் கூடாது எனில், இதில் உள்ள டிக் அடையாளத்தினை எடுத்துவிடலாம்.
4. என்டர் அழுத்திய பின்னர், கர்சர் எங்கேனும் செல்ல வேண்டும் என எண்ணினால், டிக் அடையாளம் ஏற்படுத்திப் பின்னர் அருகே உள்ள கீழ்விரிமெனுவிற்கான அம்புக் குறியினை அழுத்தி, அதில் உள்ள கீழே, மேலே, வலது மற்றும் இடது (Down, Up, Right or Left) என உள்ளதில் எந்தப் பக்கம் கர்சர் செல்ல வேண்டுமோ, அதனைத் தேர்ந்தெடுக்கவும். பின் ஓகே கிளிக் செய்து வெளியேறவும்.
இனி நீங்கள் அமைத்தபடி, டேட்டா என்டர் செய்திடுகையில், என்டர் கீ அழுத்தும்போது, கர்சர் நகர்த்தப்படும்.

டவுண்லோட் செய்த பைலில் வைரஸ் உள்ளதா?


நீங்கள் ஏதேனும் பைல் ஒன்றை டவுண்லோட் செய்கையில், திடீரென அதே தளத்திலிருந்து, "Yourantivirus will complain that this download is a virus, but don’t worry — it’s a false positive.” என செய்தி கிடைக்கும். ""உங்கள் ஆண்ட்டி வைரஸ் இந்த பைலை வைரஸ் எனச் சொன்னால், கவலைப்பட வேண்டாம். இது தவறான உறுதி” என்ற பொருளில் இது தரப்படுகிறது. இதனைக் கண்ணுற்ற சிலர் தொடர்வார்கள். சிலரோ, "எதற்கு வம்பு” என, டவுண்லோட் செய்வதனை நிறுத்திவிடுவார்கள். சரியான உண்மையை எப்படி அறிவது? இது சரிதான் என்று நீங்கள் எண்ணி, டவுண்லோட் செய்தாலும், ஏன், இது போன்ற செய்தியைக் கூறியே, மால்வேர்களைச் சிலர் நம் கம்ப்யூட்டருக்குள் அனுப்பலாமே என்ற சந்தேகமும் நமக்குக் கிடைக்கும். பின் எப்படித்தான் சந்தேகத்தினைத் தீர்த்துக் கொள்ளலாம்?
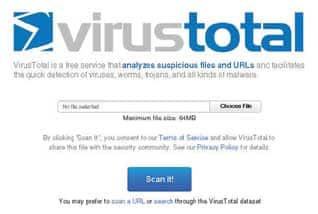
1. வைரஸ் டோட்டல் அனுப்பவும்: அனைத்து ஆண்ட்டி வைரஸ் புரோகிராம்களும் ஒரே தப்பை செய்திடாது. எனவே, டவுண்லோட் ஆகும் பைலைத் திறந்து பார்க்காமல், https://www.virustotal.com/ என்ற இணையதளம் செல்லவும். சந்தேகத்திற்கு இடமான பைலை அப்லோட் செய்திடவும். இங்கு 45 வெவ்வேறான ஆண்ட்டி வைரஸ் கொண்டு, உங்கள் பைலில் வைரஸ் உள்ளதா எனச் சோதனையிடப்பட்டு, முடிவுகள் காட்டப்படும். சில முடிவுகள், வைரஸ் என்று சொன்னால், நிச்சயம் அந்த பைலைச் சந்தேகப்பட வேண்டும்.
2.டவுண்லோட் செய்த தளத்தை சந்தேகப்படு: வைரஸ் உள்ளது எனச் சந்தேகப்பட்டால், எந்த தளத்திலிருந்து இந்த பைல் டவுண்லோட் செய்யப்பட்டதோ, அந்த தளத்தைச் சந்தேகப்பட வேண்டியதுதான். நீங்கள் கூகுள் தேடல் மூலம் இந்த பைல் இருக்கும் தளத்தை அறிந்து, அந்த பைலை இன்னொரு தர்ட் பார்ட்டி தளத்திலிருந்து பெற்றிருந்தால், நிச்சயம் அது வைரஸாக இருக்கலாம். ஆனால், பைல் தயாரித்து வழங்கும் நிறுவனத்தின் இணைய தளத்திலிருந்தே பெற்றிருந்தால், இணைய தளம், வைரஸால் தாக்கப்பட்டு, போலியான ஒன்றாக அமைக்கப்பட்டிருக்கும்.
3.மால்வேர் குறித்து சோதனை: உங்களுடைய ஆண்ட்டி வைரஸ், குறிப்பிட்ட பைலை மால்வேர் எனக் குறிப்பிட்டால், நிச்சயம் அதற்கு ஒரு பெயரைச் சுட்டிக் காட்டும்.இந்த பெயரை, கூகுள் தேடல் தளத்தில் கொடுத்துத் தேடினால், இந்த வைரஸ் பற்றிய தகவல்களும், அது எப்படி எல்லாம் பரவுகிறது என்றும் தகவல்கள் கிடைக்கும். இவற்றைக் கொண்டு, அந்த பைல் மற்றும் அது கொண்டு வரும் வைரஸ் குறித்து அறியலாம்.
ஆனால், பொதுவான ஓர் எச்சரிக்கையை நாம் மனதில் கொள்ள வேண்டும். ஏதேனும் ஒரு வகையில், பைல் ஒன்று வைரஸ் ஆக இருக்கும் என அறிந்தால், அதனை இயக்காமல் இருப்பது நல்லது. இறக்கியிருந்தால், அழித்துவிடுவது நல்லது.

Wednesday, March 26, 2014

டாகுமெண்டில் மேத்ஸ் பார்முலா


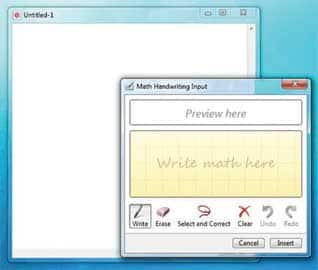
வேர்டில் டாகுமெண்ட் ஒன்றைத் தயாரித்துக் கொண்டிருக்கிறீர்கள். இதில் மேத்ஸ் பார்முலா ஒன்றை அமைக்க வேண்டும். சப்ஸ்கிரிப்ட், சூப்பர் ஸ்கிரிப்ட் எல்லாம் பயன்படுத்தி பார்முலா அமைக்கக் கஷ்டப்பட வேண்டாம். விண்டோஸ் 7 சிஸ்டத்தில் இதற்கான வழி ஒன்று தரப்பட்டுள்ளது. அதன் பெயர் Math Input Panel. இதனைப் பெற ஸ்டார் பட்டன் அழுத்திக் கிடைக்கும் சர்ச் பேனலில், Math Input Panel என டைப் செய்திடவும். உடன் மஞ்சள் நிறத்தில் கட்டம் ஒன்று கிடைக்கும். இதில் மவுஸின் உதவி கொண்டு, அதன்
கர்சரால், நீங்கள் அமைக்க வேண்டிய பார்முலாவினை அமைக்கவும். முடித்த பின்னர், அந்தக் கட்டத்தின் கீழாக உள்ள Insert என்ற இடத்தில் கிளிக் செய்தால், டாகுமெண்ட்டில் கர்சர் உள்ள இடத்தில் அந்த பார்முலா அமைந்துவிடும். இதில் மாற்றங்கள் வேண்டும் என்றாலும் மேற்கொள்ளலாம். வேர்ட் டாகு மெண்ட் என்றில்லாமல், புரோகிராம்களிலும் இதனை அமைத்துக் கொள்ளலாம். மேத்ஸ் பார்முலாக்களைத் தங்கள் டாகுமெண்ட்களில் அடிக்கடி பயன்படுத்துபவர்களுக்கு இது அதிகப் பயனுள்ளதாக இருக்கும்.
விண்டோஸ் 7 ஆப்பரேட்டிங் சிஸ்டத்தில் உள்ள math recognizer என்னும் புரோகிராம், நாம் மவுஸால் எழுதுவதனைப் புரிந்து கொண்டு, டெக்ஸ்ட்டாக அமைத்துத் தருகிறது. இந்த மேத் இன்புட் பேனல் விண்டோவில் உள்ள ஹெல்ப் அழுத்தினால், இந்த பேனல் பயன்படுத்துவது குறித்து நிறைய தகவல்கள் கிடைக்கின்றன.