Remove an e-mail account from outlook
- Click the File tab.
- On the Info tab, under Account Information, click Account Settings.
- Click Account Settings.
- Select the e-mail account that you want to remove, and then click Remove.
- To confirm removal of the account, click Yes.
To remove an e-mail account from a different profile, exit and restart Outlook with the other profile and follow the previous steps. You can also remove accounts from other profiles by doing the following:
- Exit Outlook.
- In Control Panel, click or double-click Mail
The title bar of the Mail Setup dialog box contains the name of the current profile. To select a different existing profile, click Show Profiles, select the profile name, and then clickProperties.
- Click E-mail Accounts.
- Select the account, and then click Remove.
- To confirm removal of the account, click Yes.
Gmail Outlook 2007/2010 settings
OUTLOOK 2007/2010
- Follow the instructions below to set up IMAP1 access in Outlook 2007/2010.
- Google Apps users, please follow the default instructions unless otherwise noted, replacing 'your_domain.com' with your actual domain2 name.
To set up your Outlook 2007/2010 client to work with Gmail:
- Enable IMAP in Gmail. Don't forget to click Save Changes when you're done.
- Open Outlook.
- For new setups, select Do not upgrade.
- Click Yes.
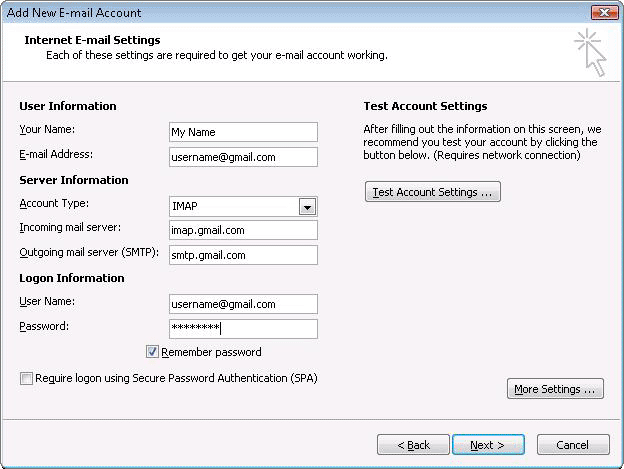
- Enter your display name, email address (including '@gmail.com'), and password. Google Apps users, enter your full email address, e.g. 'username@your_domain.com.'
- Select the 'Manually configure server settings or additional server types' checkbox.
- Select Internet E-mail.
- Settings: name, full email address (including '@gmail.com' or '@your_domain.com')
- In the Account Type dropdown menu, select IMAP. In the 'Incoming server name' section, enter: imap.gmail.com and in the 'Outgoing server name (SMTP)' section, enter: smtp.gmail.com.
- In the 'User Name' field, give your full Gmail address, including '@gmail.com' or '@your_domain.com.'
- After creating these settings, clicking Next takes you to the end of the setup.

- In the Tools menu, select Options then Mail Setup. Under 'Email Accounts,' click E-mail Accounts.
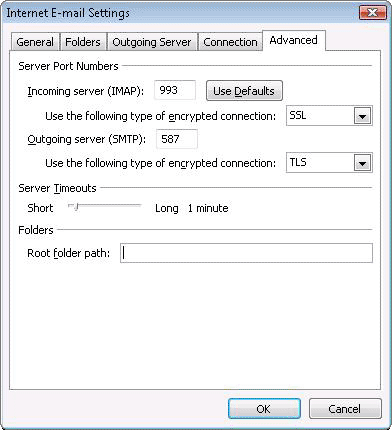
- Select an account, and click Change above the list of accounts. Click More Settings, then the Advanced tab.
- Incoming server must be 993, and must use SSL3 encryption.
- Outgoing server can use 587, TLS4 encryption.

- Click the Outgoing Server tab. Make sure that 'My outgoing server (SMTP) requires authentication' is selected. The radio button 'Use same settings as my incoming mail server' should also be selected.
- Click OK > Next > Finish > Close > OK.
- Check our recommended client settings, and adjust your client's settings as needed.


No comments:
Post a Comment