| While entering vouchers, you can mark them as Post Dated, as a result these vouchers are not updated in the ledgers till the date specified in the voucher. This is useful for entering transactions that take place on a regular basis. For example, if you issue post dated Cheques towards payment of installments, you can set up the payments in advance, and Tally.ERP 9 will only update them in the ledgers on the due date. Mark vouchers Post Dated by using CTRL + T or click on the button Post Dated from the Button Bar. This button toggles between Current and Post Dated. |
 |
Post-dated Vouchers RegisterAll Post-dated vouchers are maintained in Post-dated voucher Register.Go to Gateway of Tally> Display> Exception Reports> Post-Dated Vouchers
Difference in the treatment of Post-dated Vouchers and other Unconventional Vouchers
The major difference between post dated vouchers and other Unconventional vouchers is that post dated Vouchers affect regular books of accounts on the date of the voucher. Post-dated vouchers are not available for selection in Scenarios. |
Sunday, January 20, 2013
Post Dated Voucher in Tally


Reversing Voucher in Tally
| Reversing Journals are special journals that are automatically reversed after a specified date. They exist only till that date and are effective only when they are included in reports. These are used in interim reporting in the course of the financial year where accruals are to be reported. These accruals are usually short term and are cleared in the subsequent period. However, to get a proper perspective, decision makers require the reports with full impact of all aspects and transactions. To activate Reversing Journals, Go to Gateway of Tally
during at the end of the year, using the Reversing journal you may include them for monthly reporting or a specific period to give more accurate status or position. Let us take an example:On 30th June you want to view the Balance Sheet but June month’s rent is not been paid. You may create a Scenario(refer Scenario Management for more information) and pass a Reversing Journal entry to view the reports which will be effective up to the applicable date. When you view the Balance Sheet, Tally.ERP 9 displays the report with the reversing journals included. The voucher affects the report only for that day, 30th June. |
 |
Applicable up toThe reversing Journal is available for inclusion in a scenario report till this date. The Reversing Journal can be created asof a particular date and made Applicable up to a different date. Reversing Journal RegisterAll vouchers are maintained in a Reversing Journal Register. These are not posted to any books of accounts and cannotbe included in regular reports. They can only be seen using a scenario. Go to Gateway of Tally> Display> Exception Reports> Reversing Journals |
Stock/Inter-Godown Transfer in Tally
Stock Journal is a Journal in which all types of Stock Adjustments are entered.
The stock adjustment may be due to:
Inter-Godown Transfer
This is useful to transfer the goods from one location to another. The quantity of Stock remains the same, but
the Location changes.
Additional Cost/Expenses involved in the Transfer of goods.
You can also account the additional cost incurred in connection of transfer of materials from one location to another.
Accounting for Wastage of stock or shortage of stock
There may be a shortage or wastage of stock items, the quantity may have got changes. In such cases, you have
to enter a stock journal to account for the increase or decrease in the Stock Item. Manufacturing Process
If you are involved in the manufacturing process in which raw materials are consumed and finished goods are
produced, then you can create a manufacturing Journal Voucher also.
To view the Stock Journal Voucher:
Go to Gateway of Tally > Inventory Vouchers
For example, the company transfers Item B from the warehouse to the shop.
|
 |
Date
Enter the Date of Stock Journal entry.
Ref
Enter the reference number, if any, or leave it blank.
Note: To get the reference column in the Stock Journal, in F12: Configuration screen set Yes to Use Ref. Number
in Stock Journal.
Following are the two parts of a Stock Journal voucher:
Source (Consumption)Name of Item
Select the name of the Item from the ‘List of Items’, which needs to be transferred under ‘Source’.
Godown
Select the Godown from the List of Godowns, from which goods are getting transferred.
Quantity, Rate and Amount
Enter the quantity of the items that is getting transferred and rate, amount will popup automatically.
Destination (Production)Name of Item
Select the name of the Item from the List of Items under the column Destination.
Godown
Select the Godown from the List of Godowns, to which goods are being transferred.
Quantity, Rate and Amount
Enter the quantity of the items that is being transferred. The rate and amount will be displayed automatically.
Note: You can have a different Rate for Source (Consumption) and for Destination (Production) column for the same
Stock Item.
When there are some Additional Cost/Expenses incurred, then you can account the same in the Stock Journal.
After mentioning the quantity, rate and amount under Destination (Production), the ‘Additional Cost Details’ screen
will be displayed. Enter the additional cost/expense incurred.
Note: To get the additional cost details in the Stock Journal voucher, enable Track additional costs of Purchase in
F11: Features: F2: Inventory Features. |
 |
Stock Valuation Method
| Stock Valuation Method Report in Tally 9.0 |
The Stock Summary report with stock valuation methods can be used to view the effects of different methods
on the value of stock. Each stock item can be set up to have a different stock valuation method. In some instances, a particular method of valuation may be required, for example, to assess the replacement value or saleable value of stock. Tally.ERP 9 displays stocks in any or all the valuation methods dynamically and simultaneously, without any complicated procedure.
Suppose you want to use Last Purchase Cost method to assess the replacement value and the Last Sale Price
method for realizable (saleable) value:
In the Stock Summary screen, select the New Column button on the button bar or press Alt+C. The screen
appears as shown.
Select First in First Out (FIFO) from the Stock Valuation Methods list.
|
 |
| The Stock Summary report with First in First Out (FIFO) column is displayed as shown: |
 |
Tally permits different valuation methods for different items, that is, it does not restrict you to one method of valuation only for all items. The selection of an appropriate costing method is essential in order to select an appropriate stock valuation method. This helps in knowing the value of the stock both on cost basis and sale basis, which shows the approximate profit margins lying in the inventory.
Activating Stock Valuation
1. From the Gateway of Tally -> Inventory Info ->Stock Item Creation Screen.
2. Press F12:Configure. Advanced Entries for Inventory should be activated.
3. Return to the Stock Item screen.
4. Under behaviour, activate costing and market valuation methods by entering values in Units and Set Std Rates.
2. Press F12:Configure. Advanced Entries for Inventory should be activated.
3. Return to the Stock Item screen.
4. Under behaviour, activate costing and market valuation methods by entering values in Units and Set Std Rates.
The different costing methods are:
- Average Cost
- First In First Out (FIFO)
- Last Purchase Cost
- LIFO Perpetual (Last In First Out Perpetual)
- Monthly Avg. Cost
- Standard Cost
The different stock / market valuation methods are:
- At Zero Price
- Average Price
- Last Sale Price
- Standard Price
Average Cost / Price:
Tally recalculates the average value after each purchase or sale for the whole year.
At Zero Cost:
The stock is valued at zero cost.
FIFO (First In First Out):
Tally assumes the sale of the oldest goods first.
Last Purchase Cost / Sale Price:
The stock is valued at the latest price.
LIFO Annual (Last In First Out Annual):
Tally assumes the sale of the newest goods first taking into account the current financial year.
LIFO Perpetual (Last In First Out Perpetual):
As above, but the last purchase price continues from the previous financial year.
Monthly Avg. Cost:
Tally recalculates the average value after each purchase or sale for the whole month.
Standard Cost / Price:
A pre-determined value that you have entered earlier during the stock item creation.
Advanced Inventory features
Tally also provides the facilities for:
- Ignoring difference in stock due to physical counting.
- Ignoring negative balances.
- Treating all sales as new manufacture.
- Treating all purchases as consumed.
- Treating all rejections inward as scrap.
- Depending on the requirement, select YES or NO.
- Ignore difference Due to physical counting.
- You are allowed to record the physical stock as counted, by way of a physical stock voucher. There is, usually, a difference between physical counted stock and that appearing in the records. If you wish to ignore the difference and continue using the stock as per books, select yes. It is, however, advisable not ignore the difference.
- Ignoring negative balances.
- In case of negative balance for stock items in stock reports this option can be selected. Select as required.
- Treating all sales as new manufacture.
- This is one way to avoid negative balances in the stock records. if you wish to avoid the need to pass entries for manufacture or goods in and can be automatically done when goods are sold.
- Treating all purchases as consumed.
- Issues are automatically raised for all goods purchased, if this is selected. you do not wish to keep track of issues for this item.
- Treating all rejections inward as scrap.
- If you do not want rejected goods coming in to be taken back into stock, select
Creating Unit of Measurements
Units of Measurement
Stock Items are purchased or sold on the basis of quantity. The quantity is measured by Units. Hence, it is necessary to create Units of Measure. You can have simple units such as numbers, meters, kilograms, and pieces or compound units like box of 10 pieces [1box =10 pieces]
Stock Items are purchased or sold on the basis of quantity. The quantity is measured by Units. Hence, it is necessary to create Units of Measure. You can have simple units such as numbers, meters, kilograms, and pieces or compound units like box of 10 pieces [1box =10 pieces]
Go to Gateway of Tally > Inventory Info. > Units of Measure
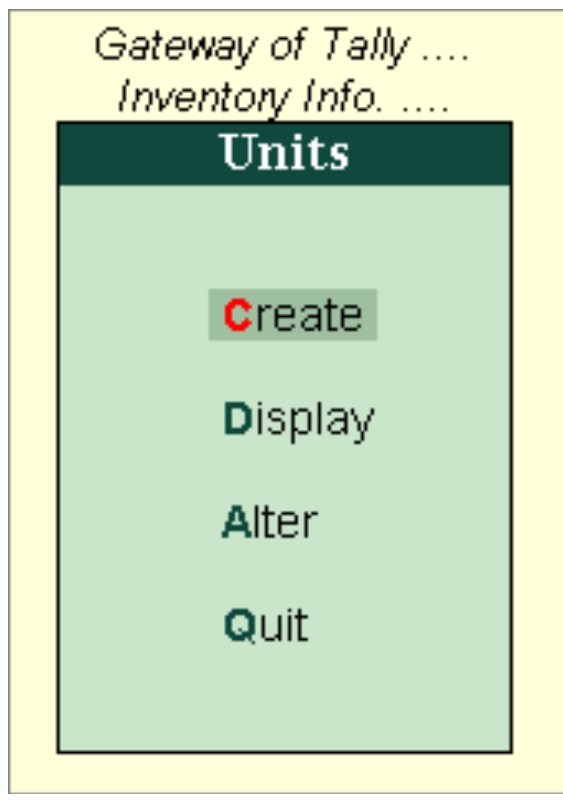
Creating Simple Units of Measure
You can create Simple and Compound units.
Go to Gateway of Tally > Inventory Info > Units of Measure > Create
The Unit Creation screen is displayed as shown.
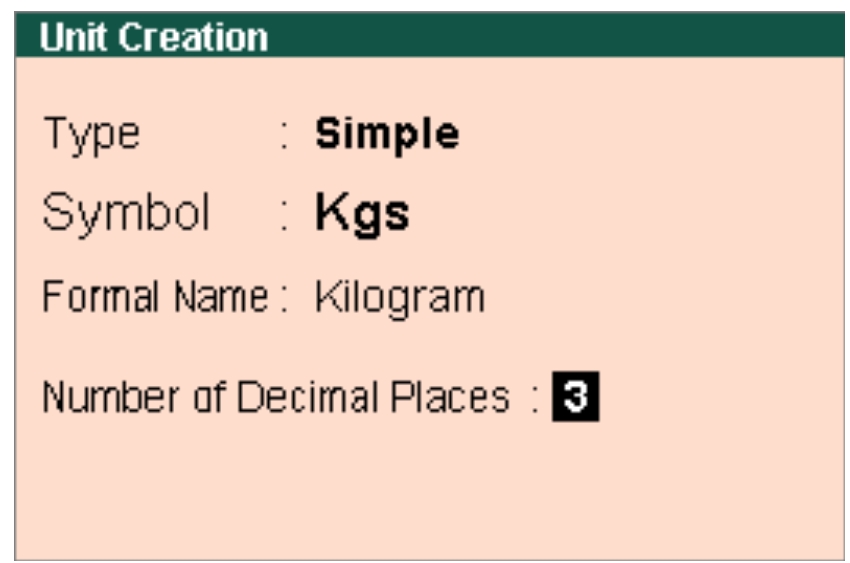
Creating a Simple Units of MeasureA brief explanation of each field in the Unit Creation screen is given below:
Type
This field will show the Type of Units.
- Simple
- Compound.
Simple units are nos, pcs, etc. Compound unit is a combination of two simple units.
By default Tally.ERP 9 will show the Simple unit for creating the unit of measure.
You can select the Compound Units by clicking on that field or by using SHIFT+TAB [cursor will go to the previous field].
Symbol
Define the symbol of the unit, e.g., Nos. This symbol is used in all displays and printouts.
Formal Name
Specify the formal name of the symbol, e.g. Numbers. This formal name is useful during the consolidation of data of different companies, where the symbols might be the same but are assigned to different units. The formal name will be used to match them.
Number of decimal places
In this field you can specify the decimal places for the Units from 0 to 4. This field is useful for Units measured in fractions.
Example:
Kilogram unit. 1.255 Kgs, here 1 is for Kg and fraction 255 is for gram. For this unit, number of decimal places required is 3.
Displaying a Units of Measure
Displaying a Units of MeasureTo display Units of Measure,
Go to Gateway of Tally > Inventory Info. > Units of Measure > Display
Select the Unit of Measure you would like to view from the Units list. You can select a compound unit or a simple unit from the list.
The Unit Display screen is displayed as shown.

In display mode it is not possible to make any changes.
Altering a Units of Measure
To alter Units of Measure
Go to Gateway of Tally > Inventory Info. > Units of Measure > Alter
Select the Unit of Measure you want to alter from the Units list. The Unit Alteration screen is displayed as shown.

Make the necessary changes and accept Yes to save or Press CTRL+A.
Note: In Alteration mode, you cannot alter the Number of Decimal places field.
You can delete a Unit of Measure from this screen by pressing Alt + D. However, you cannot delete a Unit of Measure that is part of a compound measure. You must delete the compound measure first.
Creating Compound Units of Measure
A Compound Unit is a relation between two Simple Units. Hence, before you create a Compound Unit, ensure that you have already created two Simple Units.
Example:
To Create Compound unit – Doz (Dozen) of 12 Nos (Numbers), you have to create two simple units, Doz (Dozen) and Nos (Numbers) and set the conversion factor as 12.
Go to Gateway of Tally > Inventory Info > Units of Measure > Create
The Unit Creation screen is displayed as shown. Now Click on Type field or Press SHIFT + TAB or Press Backspace Key.

Select Compound from the Types of Units and press Enter. The Conversion field will be displayed for creating Compound unit.

Field Information:
First unit: Select the First unit from the Units List. In the above example, Dozen will be the First Unit.
Conversion: Specify the conversion Factor. In the above example, Conversion factor will be 12.
Second Unit: Specify the Second Unit from the Units List. In the above example, Number will be the Second Unit. This unit is also called Tail Unit.
Use CTRL + A or Accept the Screen for Saving of Compound Unit Creation.
Creating Stock Items – Advanced
Creating a Stock item in Advance Mode
Advance mode means enabling advance configuration and Features for stock item master in F12:Configure and F11:Features.
Shown below are the advance configuration parameters for stock item master under F12:Configure (Master Configuration) :
Shown below are the advance configuration parameters for stock item master under F12:Configure (Master Configuration) :

Shown below are the advance Features for stock items in F11:Features:
Note: You can configure the entire setup according to your requirements. According to the configuration in F12 and F11, stock item master fields will get added and removed.
Go to Gateway of Tally ; Inventory Info ; Stock Items; Create (under Single Stock Item)

A brief description of each additional field in Stock Item Creation screen is given below.
Part No.
This Part number field gets enabled only after enabling Use Part Number for stock items in Inventory Master Configuration. This field is used to enter the Vendors catalogue number. You can also optionally print it in reports/invoices.
Description
The Description field gets enabled only after enabling Use Description for Stock Items in Inventory Master Configuration. This field is used to enter the description of the Stock Item as it is required to be printed in Quotations, Delivery Challan/Invoice.
Remarks
This Remarks field gets enabled only after enabling Use Remarks for Stock Items in Inventory Master configuration. This field is used to enter Remarks for the Stock Item (for internal use only). Any additional details about the Item can be entered here.
Set/Modify Default Ledgers for Invoicing?
This option gets enabled only after enabling Specify Default Ledger Allocation for Invoicing in Inventory Master Configuration. Once you enable this option, a screen will be displayed for selecting the default ledger allocation for sales and purchase for the stock item.

Note: This option is useful only in case of Invoice entry through Voucher Class.
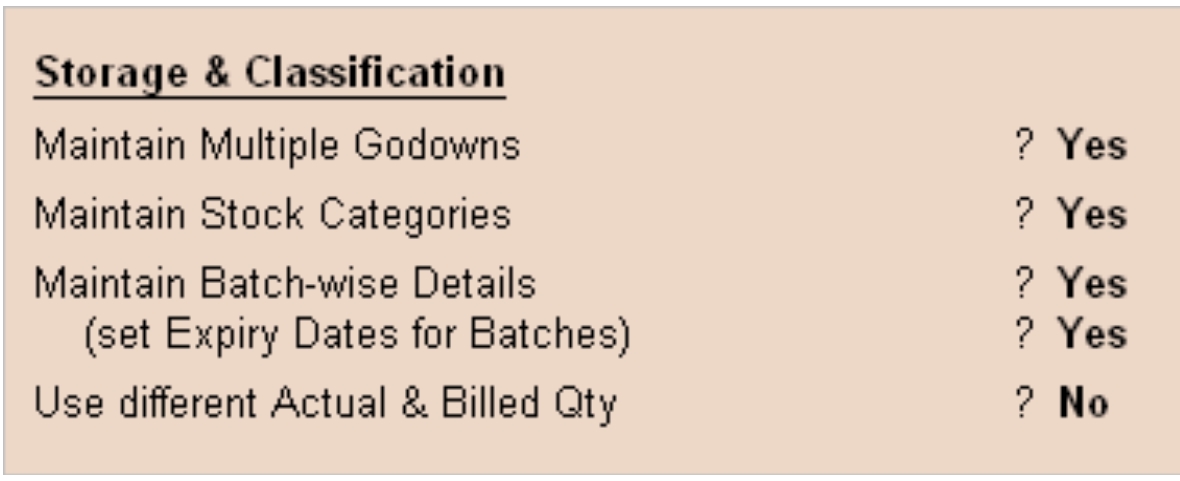
Category
This Category field gets enabled only after enabling Maintain Stock Categories in Inventory Master Features. This field will show the List of Categories. Here you can select the Stock Category under which the stock Item belongs. By default, Not Applicable is displayed in this field.
Note: You can create a new stock category by pressing ALT+C at this field.
Alternate Units
This Alternate Units field gets enabled only after enabling Use Alternate Units for Stock Item in Inventory Master Configuration. Alternate Units is another unit, apart from the main unit, which you can use for the Stock Item. This is particularly useful when you need to handle different units at different times.
Example:
1 Box contains 10 numbers of mouse. In some case, 1 Box contains 12 number of mouse. In this case, Alternate units is very useful. During entry, you can change the conversion factor between Box and number.
Maintain in Batches?
This option gets enabled only after enabling Maintain Batch wise Details in Inventory Master Features. If you want to maintain the batch information of Stock Items, set the option Maintain in Batches to Yes.
Track Date of Mfg?

This option is enabled only when Maintain in Batches? is set to Yes. If you want to specify the manufacturing date for the item, set Track Date of Mfg. to Yes.
Use Expiry Dates
This option gets enabled only after enabling Set Expiry Dates for Batches under Maintain Batch Wise Details option in Inventory Features. If you want to specify the expiry date of the item, set Use expiry dates to Yes. This option is useful for stock items like medicines, Food items, etc.
Set Component BOM
This option gets enabled only after enabling Allow Component List Details (Bills of Material) in Inventory Master Configuration. Refer to Bills of Material for more details.
Set Standard Rates
This option gets enabled only after enabling Allow Std. Rates for Stock Items in Inventory Master Configuration. This option helps you specify standard purchase rate and standard sales rates for the item.
The standards are effective from the specified dates and they continue to be used at these rates until the next date, where the standard rate changes.
Note: Standard Rates can also be used for valu ation of closing stock.
The standards are effective from the specified dates and they continue to be used at these rates until the next date, where the standard rate changes.
Note: Standard Rates can also be used for valu ation of closing stock.
Behaviour Group
Once you enable Allow Advanced Entries in Masters Behaviour Group option will be enabled.
Options available under Behaviour Group are:
Options available under Behaviour Group are:
Costing Method
This field will display the List of Costing Method for valuating the Stock Item.

Depending upon the stock item, you can select the costing method for valuating the Stock item.
A Brief description about each Costing Method:
A Brief description about each Costing Method:
At Zero Cost:
Cost of an item is considered as zero. For example, for defective items that have no commercial value.
Avg.Cost:
Periodic system:
This is also known as Weighted Average Cost. The weighted average cost for the whole year is computed as below:

Monthly system:
In monthly average cost, weighted average cost is determined on a monthly basis instead of annual.
FIFO (First-in, First-Out):
Periodic System
Under FIFO Periodic System, it is assumed that items purchased first are sold first under the current financial year (i.e., first lot from the opening stock of current year).
Perpetual System
Under FIFO Perpetual system, it is assumed that items purchased first are sold first across the financial year (i.e., first lot may be from previous year entry).
So cost of goods sold is based upon the cost of material received first in the period, while the cost of inventory is based upon the cost of material received last in the period.
Last Purchase cost
Last purchase cost is Last purchase rate. Cost of goods sold and Cost of inventory is based upon the Last purchase rate.
LIFO (Last-in, First-Out)
Periodic system
Under LIFO, it is assumed that items purchased last are sold first under the current financial year (i.e., first lot from the opening stock of current year)
Perpetual System
Under LIFO Perpetual system, it is assumed that items purchased last are sold first across the financial year (i.e., first lot may be from previous year entry).
So cost of goods sold is based upon the cost of materials received last in the period, while the cost of inventory is based upon the cost of material received first in the period.
Standard Cost
Standard Cost is Standard Rates specified in the Inventory master.
Cost of goods sold and Cost of inventory is based upon the Standard Rates.
Market Valuation Method
By using Market Valuation Method, you can determine the realisable worth of an Item.
Unrealised Profit of an Item = Closing value as per Costing Method – Closing value as per Market valuation method.
Select the appropriate method applicable for the Item from the Valuation Methods List.

At Zero Price
Realisable price of an item is considered as zero.
Example: For defective items that have no realisable value in the market.
Average Price
Weighted Average is computed as the sum of all invoice value / sum of all invoice quantity for the financial year.
Last Sale Price
Item is valued at Last Sale Price.
Standard Price
User specified rate applicable for the current date specified in Item master under Standard Rate is taken as the realizable rate.
Ignore Diff. due to Physical Counting?
In Tally.ERP 9, you can record the physical stock as counted, using a physical stock voucher. If you wish to ignore the difference and continue with the stock as per books, set this option to Yes.
Ignore Negative Balances?
If you set this to Yes, Tally.ERP 9 ignores the item in the stock reports, in case it has a negative balance.
Treat all Sales as New Manufacture?
If you set this to Yes, whenever a sales entry is made, Tally.ERP 9 automatically updates the quantity and value in inward by treating the same entry as a New manufacture or purchase.
Treat all Purchases as Consumed?
If you set this to Yes, then, whenever a purchase entry is made, Tally.ERP 9 automatically updates the quantity and value in outward by treating the same entry as consumed.
Treat all Rejections inward as Scrap?
If you set this to Yes, then, whenever a rejection inward entry has been made [without tracking number], Tally.ERP 9 automatically reduces the amount from the closing stock balance. In this case, you need not pass the credit note for reducing the value against rejection inward.
This is used for defective items returned by the customer.
Allow use of expired Batches?
This option will get enabled once you enable the Use expiry dates under Maintain in Batches option.
If you set this to Yes, during selection of batches in voucher entry, expiry batches also get included in the List of Active Batch.
Creating Stock Items
Stock Item refers to goods that you manufacture or trade. It is the primary inventory entity and is the lowest level of information on your inventory. You have to create a Stock Item in Tally.ERP 9 for each inventory item that you want to account for.
Go to Gateway of Tally ; Inventory Info. ; Stock Items
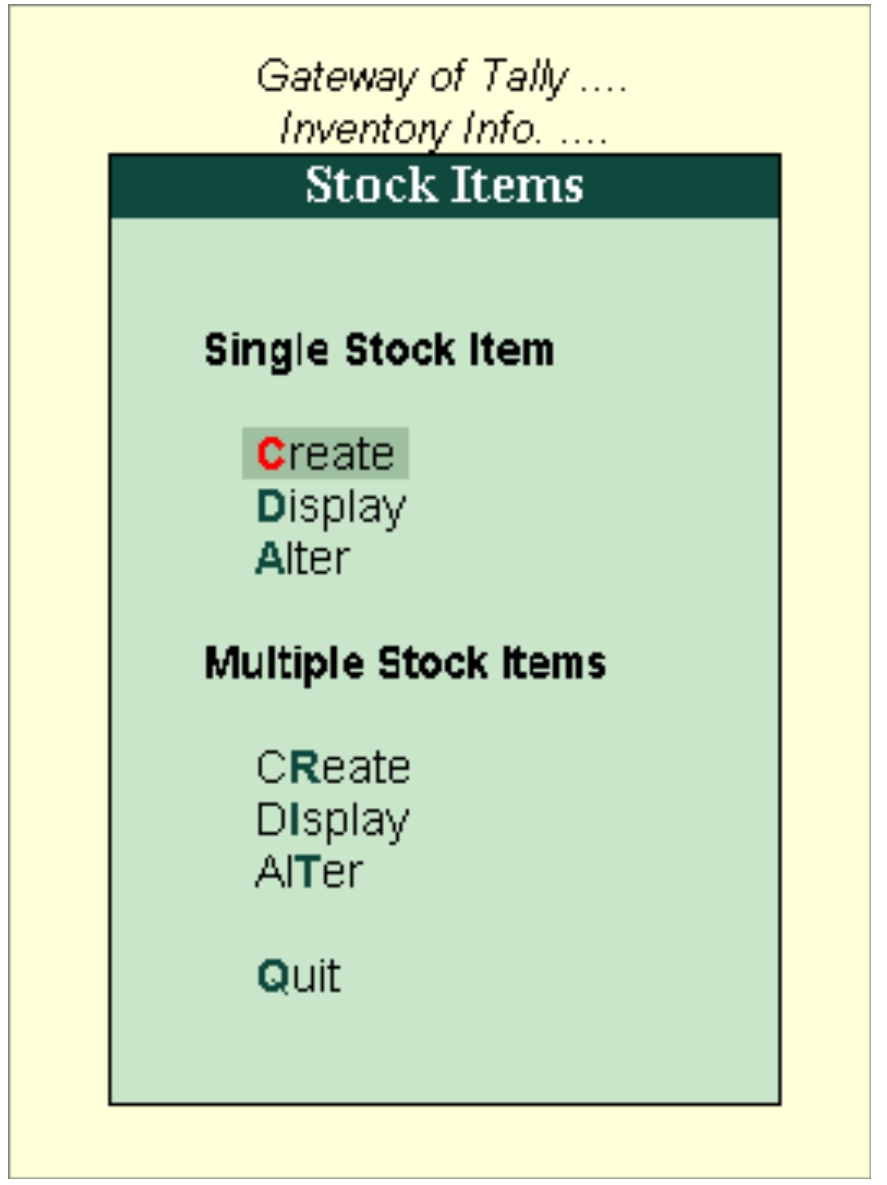
Creating a Stock Item
Two Modes of Creation:
1. Normal Mode
2. Advance Configuration Mode.
2. Advance Configuration Mode.
Creation of Stock item in Normal Mode:
Go to Gateway of Tally; Inventory Info ; Stock Item ; Single Create (under Single Stock Item)
Stock Item creation is displayed as shown:
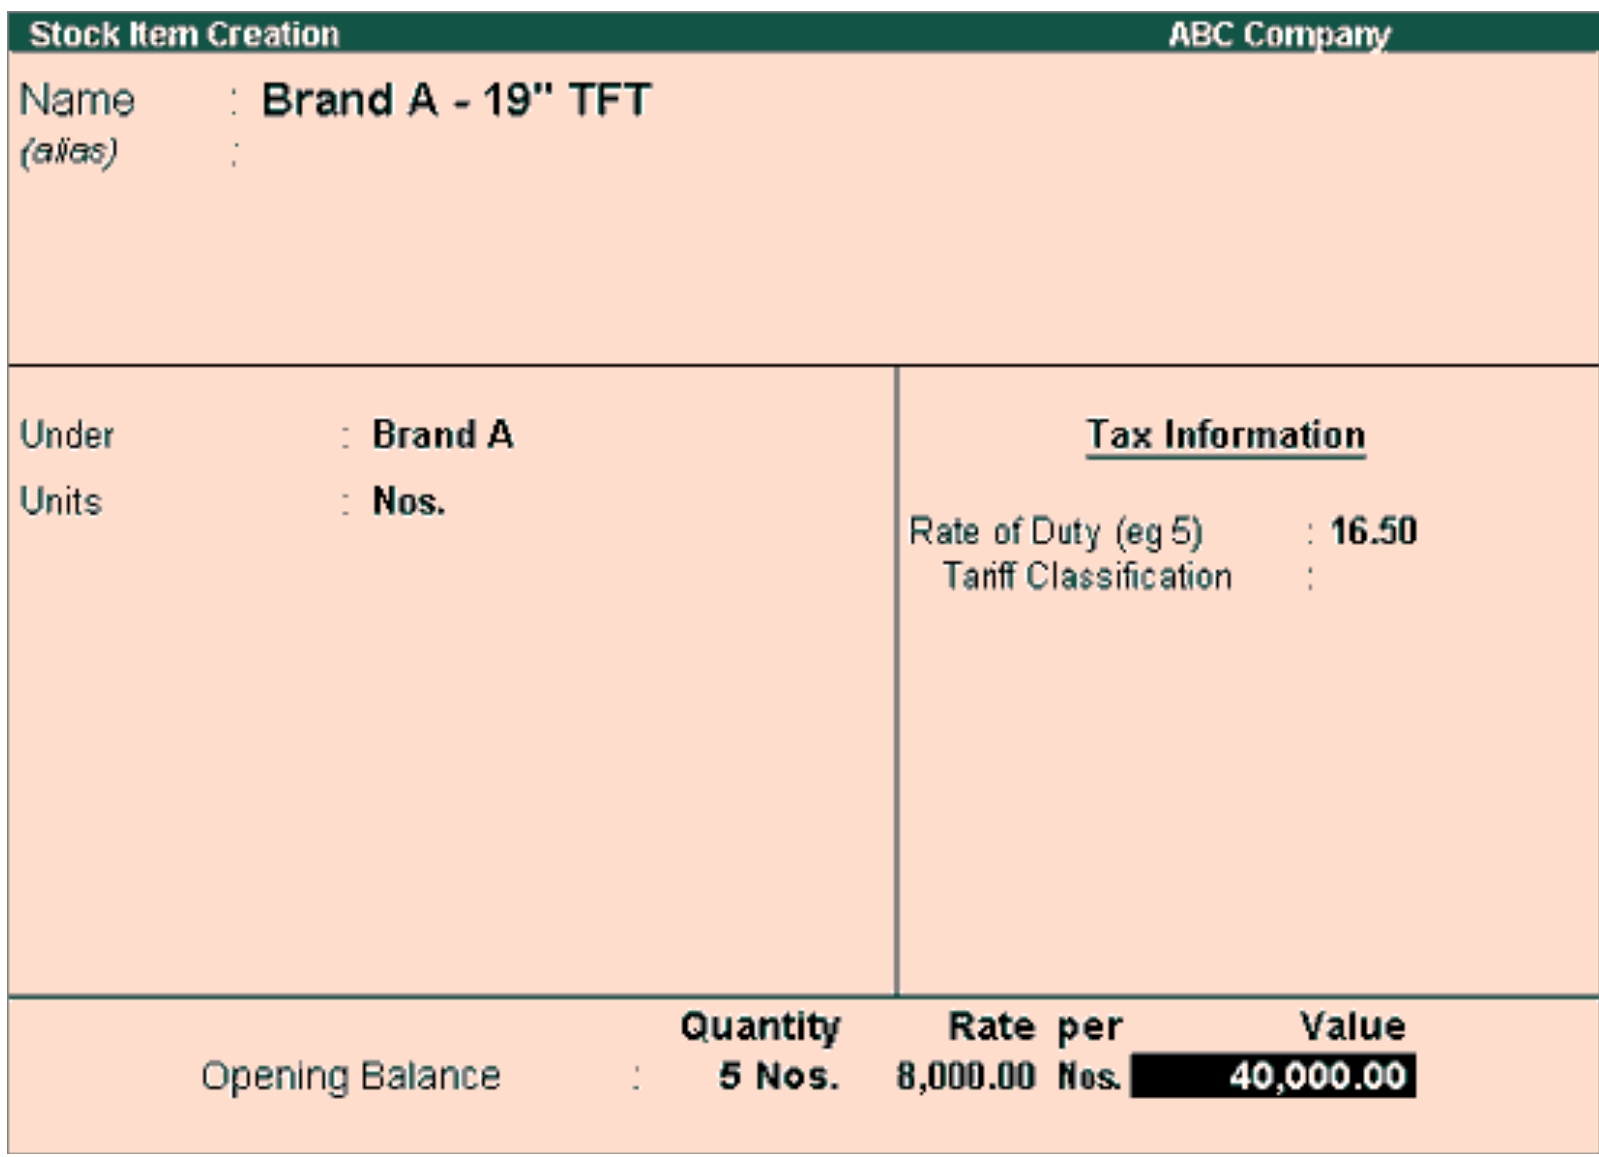
A brief description of each field in the Stock Item Creation screen follows:
Name
Specify the name of the Stock Item.
Alias
Specify the Alias name of Stock Item (if required).
Under
This field will show the List of Groups. Here you can select the Stock Group to which the Stock Item belongs. By default, Primary Stock Group appears in this field.
Note: You can create a new stock Group by pressing ALT+C at this field.
Units
This field will show the Unit List. Here you can select the Unit of measurement applicable for the stock item. By default, Not Applicable appears in this field.
Note: You can create a new Unit by pressing ALT+C at this field.
Rate of duty
Specify the Rate of Duty applicable for the stock item. This field is used for the calculation of excise duty or if duty is based on item rate. During Invoicing, whenever you select a Stock Item, the Rate of duty entered here is displayed in the Invoice creation screen.
Note: In F11 Inventory features, if Allow Invoicing is set to No then Rate of Duty field will not be visible.
Tariff Classification
Specify the Tariff Classification for the item, if applicable.
This field will appear only when you specify a value in the Rate of Duty field.
This field will appear only when you specify a value in the Rate of Duty field.
Opening Balance
Specify the details of Opening Stock, if any, for the Stock Item as on the date of Beginning of Books.
1. In the Quantity Field, specify the stock item Quantity, say 5 Nos.
2. In the Rate Field, specify the stock item Rate, say Rs. 8000 per piece.
3. In the Value Field, Tally.ERP 9 automatically calculates the value by multiplying the Quantity and Rate. You can also edit the value, Tally.ERP 9 automatically refreshes the Rate field accordingly.
Note: If Unit field is Not Applicable then the cursor will move from Quantity and Rate Field.
Buttons specific to Single Stock item creation:
| Buttons | Short Cut Keys | Description and Use |
| G: Groups | CTRL+G | Allows you to Create a Stock Group. |
| I: Items | CTRL+I | Allows you to Create a Stock Item. |
| U: Units | CTRL+U | Allows you to Create a Unit of Measure. |
| O: Godown | CTRL+O | Allows you to Create a Godown. |
| V: Vch Types | CTRL+V | Allows you to Create a Voucher Types |
Note: Category and Godown buttons are visible only if you opted for the same in F11: Features.
Creating a Stock item in Advance Mode
Advance mode means enabling advance configuration and Features for stock item master in F12:Configure and F11:Features.
Shown below are the advance configuration parameters for stock item master under F12:Configure (Master Configuration) :
Shown below are the advance Features for stock items in F11:Features:
Note: You can configure the entire setup according to your requirements. According to the configuration in F12 and F11, stock item master fields will get added and removed.
Go to Gateway of Tally ; Inventory Info ; Stock Items ; Create (under Single Stock Item)
Creating stock Category II
Displaying a Stock Category
You can display a Stock category in Single and Multiple mode.
Displaying a Single Stock Category
Go to Gateway of Tally > Inventory Info. > Stock Categories > Display (under Single Stock Category)
Select the Category for which you want to view the display details from the List of Categories.
The Stock Category Display screen shows the details entered in Stock Category Master.

Buttons specific to stock Category Display mode:
| Buttons | Short Cut Keys | Description & Use |
| G: Group | CTRL+G | Allows you to Display a Stock Group. |
| I: Item | CTRL+I | Allows you to Display a Stock Item. |
| U: Units | CTRL+U | Allows you to Display a Unit of Measure. |
| O: Godown | CTRL+O | Allows you to Display a Godown. |
| V: Vch Types | CTRL+V | Allows you to Display a Voucher Types |
Note: Godown buttons are visible only if you have opted for the same in F11: Features.
Displaying Multiple Stock Categories
Go to Gateway of Tally > Inventory Info. > Stock Categories > Display (under Multiple Stock Categories)
Select the Stock Category from the List of Categories.

If you select All Items from the List of Groups, all the categories and sub categories are displayed.

If you select Monitor from the List of Categories, all the sub categories related to Monitor will be displayed.

Buttons specific to stock group Display mode:
| Buttons | Short Cut Keys | Description & Use |
| F4: Parent | CTRL+F4 | Allows you to Display a Stock Group. |
| G: Groups | CTRL+G | Allows you to Display a Stock Item. |
| I: Items | CTRL+I | Allows you to Display a Unit of Measure. |
| O: Godown | CTRL+O | Allows you to Display a Godown. |
Note: Buttons are visible only if you have opted for the same in F11: Features.
Altering a Stock Category
Go to Gateway of Tally > Inventory Info. > Stock Categories > Alter (under Single Stock Category)
Select the Stock Category from the List of Categories.
The Stock Category Alteration screen is displayed as shown.

Make the necessary changes and click Yes to accept or press CTRL+A to Save.
Deletion is possible only in the alteration mode,. For deleting the Stock Category, Press ALT+D.
Note:
You cannot delete a stock Category, if it is used by any sub Category or stock items. In order to delete the Stock Category, first delete the relevant sub Category and Stock items.
Buttons specific to stock group Alter mode:
| Buttons | Short Cut Keys | Description & Use |
| G: Groups | CTRL+G | Allows you to Alter a Stock Group. |
| I: Items | CTRL+I | Allows you to Alter a Stock Item. |
| U: Units | CTRL+U | Allows you to Alter a Unit of Measure. |
| O: Godown | CTRL+O | Allows you to Alter a Godown. |
| V: Vch Types | CTRL+V | Allows you to Alter a Voucher Types |
Note: Godown buttons are visible only if you have opted for the same in F11: Features.
Altering Multiple Stock Categories
Go to Gateway of Tally > Inventory Info. > Stock Categories > Alter (under Multiple Stock Categories)
Select the Stock Category from the List of Stock Categories. The Multi Stock Group Alteration screen is displayed as shown.

Make the necessary changes and click Yes to accept or Press CTRL+A to save.
Note: You cannot delete a Stock Category in multiple mode.
Buttons specific to Multi stock Category Alter mode:
| Buttons | Short Cut Keys | Description & Use |
| F4:Parent | F4 | Allows you select Stock Category from Under Category Field for changing the parent of sub Category. |
| F4: Parent | CTRL+F4 | Allows you to select parent [Stock Category] from List of Category. You can able to alter the sub Category of selected Stock Category. |
| F6: Skip Names | F6 | Cursor will not go to Column Name of Stock Category. If you want to alter only the details of Under Column then you can skip names. |
| F7: Skip Parent | F7 | Cursor will not go to column Under. If you do not want to alter parent then you can skip parent. |
| G: Groups | CTRL+G | Allows you to Alter a selected stock Group in Multi-stock Group screen. |
| I: Items | CTRL+I | Allows you to Alter a selected Item in Multi Stock Item screen. |
| O: Godown | CTRL+O | Allows you to Alter a selected Godown in Multi Godown screen. |
Note: Godown buttons are visible only if you have opted for the same in F11: Features.
Creating Stock Category-1
Stock Category offers a parallel classification of stock items. Like stock Groups, classification is done based on similarity in behaviour.
For example,
| Stock item | Sub Group | Main Group | Sub – Category | Main Category |
| Brand A | 19″ TFT | Brand A | Grade One | TFT Monitor |
| Brand A | 17″ CRT | Brand A | Grade One | CRT Monitor |
| Brand B | 19″ TFT | Brand B | Grade Two | TFT Monitor |
| Brand B | 17″ CRT | Brand B | Grade Two | CRT Monitor |
The advantage of Categorizing items is that you can classify the stock items (based on functionality) together – across different stock groups which enables you to obtain reports on alternatives or substitutes for a stock item.
You now have the details of TFT and CRT products, duly classified. You can also view the Monitor classification.
For enabling Stock Category option in the Inventory Info menu, press F11 > Inventory Features > Set Yes for Maintain Stock Categories.
Go to Gateway of Tally > Inventory Info. > Stock Category

Creating a Stock Category
Go to Gateway of Tally > Inventory Info. > Stock Categories > Create (under Single Stock Category)

The Stock Category Creation screen is displayed as shown.
A brief description of each field in the Stock Category Creation screen is given below:
Name
Enter the name of the Stock Category.
Under
Specify whether it is a primary category or a sub-category of another category. Select Primary from the list, if you do not have a parent group. Use ALT + C to create a parent if you do not have the required category in the list.
Buttons specific to stock category creation:
| Buttons | Short Cut Keys | Description & Use |
| G: Groups | CTRL+G | Allows you to Create a Stock Group. |
| I: Items | CTRL+I | Allows you to Create a Stock Item. |
| U: Units | CTRL+U | Allows you to Create a Unit of Measure. |
| O: Godown | CTRL+O | Allows you to Create a Godown |
| V: Vch Types | CTRL+V | Allows you to Create a Voucher Types |
Note: Godown buttons are visible only if you have opted for the same in F11: Features.
Creating Multiple Stock Categories
Go to Gateway of Tally > Inventory Info. > Stock Categories > Create (under Multiple Stock Category)
The Multiple Stock Category Creation screen is displayed as shown.

A brief description of each field in the Multi Stock Category Creation screen is given below:
Under Category:
This field will display the List of Categories. You can select a category for which a multiple sub-category can be created.
If you select All Items in List of categories, selection of parent category Under column is possible during creation of sub-category.
If you select specific category in List of Categories, that category will get populated automatically whenever creation of sub-category and cursor skips Under column.
Name of the category
Specify the name of the Stock Category.
Under
If you have select All Items in Under Category, you must specify a parent category in this column.
Buttons specific to Multi Stock Category screen:
Buttons
|
Short Cut Keys
|
Description and Use
|
| F4: Parent | F4 | Allows you to change the parent for all Categories. |
| G: Groups | CTRL+G | Allows you to Create a Multi Stock Group. |
| I: Items | CTRL+I | Allows you to Create a Multi Stock Item. |
| O: Godown | CTRL+O | Allows you to Create a Multi Godown |
Subscribe to:
Posts (Atom)