LAYERS
Think of a layer as a transparent sheet on which you paint. Paint Shop Pro allows up to 100 layers. You can see through each layer to the layers under it until you add color. You can add layers, delete layers, and change the position of layers. Each layer is independent of all other layers until layers are merged. The layer you are currently working on is called theactive layer. There are three types of Paint Shop Pro layers: raster, vector, and adjustment.
Raster layers store information by using pixels. If you zoom in on an image, you can see small squares. Each of these squares is a pixel. On a raster layer a single object cannotbe moved without affecting the entire layer.
Vector layers do not use pixels to store information. Instead, vector layers store the instructions on how to draw the image. On a vector layer, each object is independent and can be moved without affecting the rest of the layer.
Vector objects cannot be placed on raster layers, and raster objects cannot be placed on vector layers. You can, however, merge a vector layer with a raster layer�the result is a raster layer. Vector layers can be used with images of any color depth. Raster layers can be used only with 24-bit and grayscale images.
Adjustment layers are used to make color corrections to multi-layer images. Corrections are made to the layers below the active layer. Adjustment layers are not covered in this lesson.
The "Background" layer is a special type of layer. When you create a new image and select any "colored" Background type, Paint Shop Pro displays the selected color as a background on a layer Paint Shop Pro creates called the "Background" layer. When you select transparent as the background color, Paint Shop Pro creates a layer called Layer 1, displays the background as checkerboard, and does not create a "Background" layer.
The checkerboard background created when you select Transparent as the background color cannot be moved. The "Background" layer displays the background and likewise cannot be moved up the stack of layers. The contents of the "Background" layer can, however, be promoted to a layer.
You use the Mover tool to move layers. The Mover tool finds the first nontransparent area beneath where you place the pointer and moves that layer. This might not be the current active layer. To move the active layer, hold down the Shift key as you place your pointer on the image.
| Layer Options | |
| Layer Group | Assigns a group number. All layers assigned the same number are members of the same group. If you move a layer that is a member of a group, all the layers in that group move with it. |
| Opacity | Determines the transparency of a layer. A setting of 1 makes the paint almost completely transparent. A setting of 100 makes the paint opaque. |
| Layer Visible | Select to view a layer. Deselect to makes the layer invisible. |
| Lock Transparency | Restricts the any effects applied to nontransparent areas of the image. If this option is selected, you cannot paint or paste to any transparent area. This option is not available for vector and adjustment layers. |
| Mask Enabled for This Layer | Select to view the layer with the effect of any mask that has been applied to the layer. Deselect to view the layer without the effect of any mask that has been applied to the layer. |
| Mask Locked with Layer | Select to flip, rotate, and mirror the mask and the image together. If not selected, these options are applied to the mask and the layer independent of one another. |
The Layer Palette
The Layer palette is a useful tool when you're working with images that contain more than one layer. It provides several icons that enable you to easily adjust your layer options. You open the Layer palette by clicking on the Toggle Layer Palette icon on the toolbar or by pressing "L" on the keyboard.
Toggle Layer Palette Icon
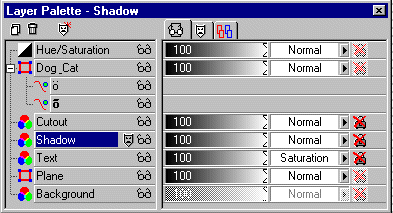
Layer Palette Options
| Layer Palette Options | |
| Creates a new layer. | |
| Deletes the selected layer. | |
| Creates a mask. | |
Displays the Layer Opacity slider, Blend Mode icon, and Lock Transparency icon. 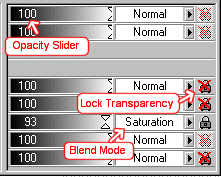 Opacity slider: Adjusts the layer's opacity. Layer Blend Mode icon: Selects a Blend Mode. Lock Transparency icon: Toggles the Lock Transparency option on and off. | |
Displays the Enable Layer Mask Toggle and the Link Mask Toggle. 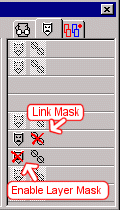 Enable Layer Mask: Toggle on to view the layer with the effect of any mask that has been applied to the layer. Toggle off to view the layer without the effect of any mask that has been applied to the layer. Link Mask: Toggle on to flip, rotate, and mirror the mask and image together. Toggle off to apply these options to the mask and the layer independent of one another. | |
Displays the Layer Group Toggle. 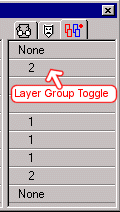 Clicking in the Layer Group Toggle toggles through layer numbers. All layers with the same number are members of the same group. Nonemeans the layer is not assigned to a group. | |
| Identifies raster layers. | |
| Identifies vector layers. | |
| Identifies adjustment layers. | |
| Placing the pointer on a layer name and pausing for a second causes the contents of the layer to display. | |
| Placing the pointer on a mask and pausing for a second causes the mask to display. | |
| Toggles the layer visibility on and off. If the visibility is on, you can see the layer/object. If the visibility is off, you cannot see the layer/object. | |
Exercises:
Background Layer -- Colored Background
This exercise illustrates how using a colored background creates a "Background" layer.- Open a new file.
File > New
Settings:
Width: 100 Pixels
Height: 100 Pixels
Resolution: 72 pixels/inch
Background Color: White
Image Type: 16.7 Million Colors
- Select Layers from the menu bar.
- Look at the bottom of the Layers menu. Note that there is a "Background" layer.
- Close the image. Save your image if you like.
File> Close
Transparent Background
This exercise illustrates the effect of using a transparent background. When you use a transparent background, PaintShop Pro does not create a "Background" layer.- Open a new file.
File > New
Settings:
Width: 100 Pixels
Height: 100 Pixels
Resolution: 72 pixels/inch
Background Color: Transparent
Image Type: 16.7 Million Colors
- Select Layers from the menu bar.
- Look at the bottom of the Layers menu. Note that there is no "Background" layer. The checkerboard background displaying on the canvas indicates the image is transparent.
- Close the image.
File> Close
Save your image if you like.
Working with Layers
This exercise illustrates the effect of placing objects on three separate layers.- Open a new file.
File > New
Settings:
Width: 100 Pixels
Height: 100 Pixels
Resolution: 72 pixels/inch
Background Color: White
Image Type: 16.7 Million Colors
- Set your Grid Preferences.
File > Preferences > General Program Preferences > Rulers and Units
Units: Pixels
Horizontal Spacing: 20
Vertical Spacing: 20
- Turn on the Grid, if it is not already on.
View > Grid
- Set your foreground color to red:
Settings:
Red: 255
Green: 0
Blue: 0
- Set your background color to blue.
Settings:
Red: 0
Green: 0
Blue: 255
- Create three new raster layers.
Layers > New Raster Layer
Name: Bottom
Blend Mode: Normal
Opacity: 100
Group: 0
Layer is Visible: Yes
Lock Transparency: No
Mask is Enabled for the Layer: Yes
Mask is Locked with Layer: Yes
Auto Proof: Yes
Layers > New Raster Layer
Name: Middle
Blend Mode: Normal
Opacity: 100
Group: 0
Layer is Visible: Yes
Lock Transparency: No
Mask is Enabled for the Layer: Yes
Mask is Locked with Layer: Yes
Auto Proof: Yes
Layers > New Raster Layer
Name: Top
Blend Mode: Normal
Opacity: 100
Group: 0
Layer is Visible: Yes
Lock Transparency: No
Mask is Enabled for the Layer: Yes
Mask is Locked with Layer: Yes
Auto Proof: Yes
- Move to the Middle layer.
Layers > Middle
- Select the Paint Brush tool.
Shape: Square
Size: 20
Hardness: 100
Opacity: 100
Step: 25
Density: 100
Paint Brush Options
Paper Texture: None
Built Up Brush: Yes
- Draw a red line across the center of the image by using the Paint Brush tool and the foreground color (left-click to draw).

- Move to the Bottom layer.
Layers > Bottom
- Draw a blue line down the second column of the image by using the Paint Brush tool and the background color (right-click to draw).

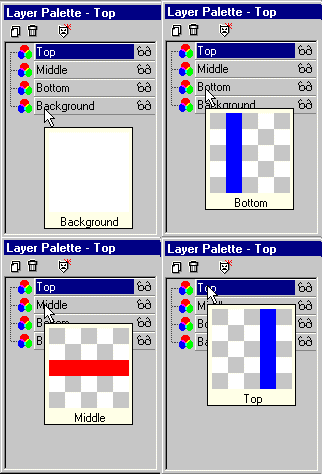
Note how the blue line appears behind the red line.
- Move to the Top layer.
Layers > Top
- Draw a blue line down the fourth column of the image by using the Paint Brush tool and the background color (right-click to draw).

Note how the blue line appears in front of the red line.
- To see the contents of each layer, open the Layers palette (press the letter "l" on your keyboard) and place the pointer on the layer names one at a time.
- Move to the Bottom layer.
Layers > Bottom
- Move the Bottom layer to the top.
Layers > Arrange > Bring to Top
- Close the image. Save your image if you like.
File> Close
Moving a Layer
This exercise illustrates moving a layer.- Open a new file.
File > New
Settings:
Width: 200 Pixels
Height: 200 Pixels
Resolution: 72 Pixels/inch
Background Color: White
Image Type: 16.7 Million Colors
- Create two new raster layers.
Layers > New Raster Layer
Name: Green
Blend Mode: Normal
Opacity: 100
Group: 0
Layer is Visible: Yes
Lock Transparency: No
Mask is Enabled for the Layer: Yes
Mask is Locked with Layer: Yes
Auto Proof: Yes
Layers > New Raster Layer
Name: Orange
Blend Mode: Normal
Opacity: 100
Group: 0
Layer is Visible: Yes
Lock Transparency: No
Mask is Enabled for the Layer: Yes
Mask is Locked with Layer: Yes
Auto Proof: Yes
- Move to the Green layer.
Layers > Green
- Select the Picture Tube tool.
Settings:
Tube: 3D Green
Scale: 100
Placement Mode: Random
Selection Mode: Random
Step: 1
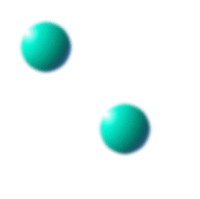
- Click twice on the image to create two spheres. Your image should look like the one shown here.
- Move to the Orange layer.
Layers > Orange
- Select the Picture Tube tool.
Settings:
Tube: 3D Orange
Scale: 100
Placement Mode: Random
Selection Mode: Random
Step: 1
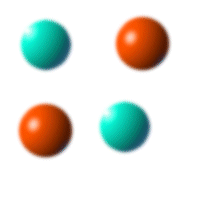
- Click twice on the image to create two spheres. Your image should look like the one shown here.
- Select the Mover tool
 .
. - Click on a green sphere and drag to move the green layer.
- Click on an orange sphere and drag to move the orange layer.
- Hold down the Shift key as you place the pointer on the image to move to the active layer.
- Close the image. Save your image if you like.
File> Close
Layer: Blend Modes
Blend Modes are particularly useful when you want to change the color but maintain the gradations of color on the existing image. The exercise that follows illustrates using a Blend Mode with a layer.- Open Smearing Gold.pat.
File > Browse
In the Browse window, open the Patterns folder under the Paint Shop Pro 6 folder. Double-click onSmearing Gold.pat.
- Close the Browse window.
- Make a copy of the image.
Edit > Copy
- Create a new image so you can work with the new image instead of the original.
Edit > Paste > As New Image
- Set your foreground color to green.
Settings:
Red: 0
Green: 128
Blue: 0
- Create a new raster layer.
Layers > New Raster Layer
Name: Color
Blend Mode: Normal
Opacity: 100
Group: 0
Layer is Visible: Yes
Lock Transparency: No
Mask is Enabled for the Layer: Yes
Mask is Locked with Layer: Yes
Auto Proof: Yes
- Flood-fill the image with the foreground color.
Flood Fill Tab Settings:
Fill Style: Solid Color
Blend Mode: None
Paper Texture: None
Match Mode: None
Opacity: 100
Sample Merged: Yes
- Open the Layer Property dialog box (press the letter "l" on your keyboard). Cycle through the Blend Mode options. Note the effect on your image.
Layers > Properties

- Close the files. Do not save Smearing Gold.pat. Save the new image, if you like.
File > Close
No comments:
Post a Comment