THE PRESET SHAPES TOOL
You use the Preset Shapes tool to draw rectangles, squares, ellipses, circles, triangles, pentagons, hexagons, octagons, stars, and arrows. There are several tool options you can set when working with a preset shape.
| Preset Shape Tool Options | |
| Line Width | Determines the width of the line that outlines a preset shape. |
| Antialias | Smoothes the edges of the preset shape. |
| Create As Vector | Enables you to create the preset shape as a vector object (refer to the layers section for more information on vector objects). If you select the Create As Vector option and your active layer is not a vector layer, PaintShop Pro automatically creates a new vector layer. |
| Join | Determines the shape of the object's corners. A miter join produces pointed corners, a round join produces round corners, and a bevel join produces flat corners. |
| Stroked Style | If you left-click as you drag to draw the object, the Stroked style creates an outline of the shape in the foreground color. If you right-click as you drag to draw the object, the Stroked style creates an outline of the shape in thebackground color |
| Filled Style | Draws the preset shape with no outline and filled with the foreground color if you left-click as you drag to draw the object. Draws the preset shape with no outline and filled with the background color if you right-click as you drag to draw the object. |
| Stroked and Filled Style | Outlines the preset shape and fills the shape with color. If you left-click as you draw, you will outline the preset shape with the foreground color and fill the preset shape with the background color. If you right-click as you draw, you will outline the preset shape with the background color and fill the preset shape with the foreground color. |
Exercises
Stroked � Raster
With the Stroked style, if you left-click as you drag to draw the object, the Stroked style creates an outline of the shape in the foreground color. If you right-click as you drag to draw the object, the Stroked style creates an outline of the shape in the background color. Objects on raster layers, are not independent of one another and cannot be moved without affecting the rest of the objects on the layer.
- Open a new file.
File > New
Settings:
Width: 100 Pixels
Height: 100 Pixels
Resolution: 72 Pixels/inch
Background Color: White
Image Type: 16.7 Million Colors
- Set your foreground color to green.
Settings:
Red: 0
Green: 128
Blue: 0
- Select the Preset Shapes tool
 . Set the tool options.
Preset Shapes Tab Settings:
Shape Type: Ellipse
Style: Stroked
Line Width: 5
Antialias: Yes
Create As Vector: No
- Move to the center of the canvas, left-click, and drag outward to create an ellipse.
- Your image should look like the one shown here.

- Close the file. Save the file if you like.
File > Close
Filled � Vector
The Filled style draws the preset shape with no outline and filled with the foreground color if you left-click as you drag to draw the object. The Filled style draws the preset shape with no outline and filled with the background color if you right-click as you drag to draw the object. Vector objects are independent of each other and can be moved without affecting other objects on the layer.
- Open a new file.
File > New
Settings:
Width: 100 Pixels
Height: 100 Pixels
Resolution: 72 Pixels/inch
Background Color: White
Image Type: 16.7 Million Colors
- Set your foreground color to green.
Settings:
Red: 0
Green: 128
Blue: 0
- Set your background color to brown.
Settings:
Red: 128
Green: 0
Blue: 0
- Select the Preset Shapes tool. Set the tool options.
Preset Shapes Settings:
Shape Type: Triangle
Style: Filled
Line Width: 5
Antialias: Yes
Create As Vector: Yes
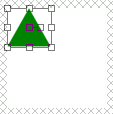
- Move the pointer to the upper left corner of the canvas and drag downward diagonally to create a triangle. Your image should look like the one shown here.
- Deselect the triangle.
Selections > Select None
- Select the Preset Shapes tool.
Preset Shapes Tab Settings:
Shape Type: Octagon
Style: Filled
Line Width: 5
Antialias: Yes
Create As Vector: Yes
- Move the pointer to the center of the canvas, right-click, and drag downward diagonally to create an octagon. Your image should look like the one shown here.
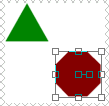
- Left-click the center handle and drag the octagon upward. Notice that the octagon moves independent of the triangle.

- Close the file. Save the file if you like.
File > Close
Stroked and Filled Vector
The stroked and filled style outlines the preset shape and fills the shape with color. If you left-click as you draw, you will outline the preset shape with the foreground color and fill the preset shape with the background color. If you right-click as you draw, you will outline the preset shape with the background color and fill the preset shape with the foreground color.
- Open a new file.
File > New
Settings:
Width: 100 Pixels
Height: 100 Pixels
Resolution: 72 Pixels/inch
Background Color: White
Image Type: 16.7 Million Colors
- Set your foreground color to green.
Settings:
Red: 0
Green: 128
Blue: 0
- Set your background color to yellow.
Settings:
Red: 255
Green: 255
Blue: 0
- Select the Preset Shapes tool. Set the tool options.
Preset Shapes Tab Settings:
Shape Type: Arrow 1
Style: Stroked & Filled
Line Width: 5
Antialias: Yes
Create As Vector: Yes
- Move the pointer to the left center of the canvas and drag the pointer towards the right side of the canvas to create an arrow.
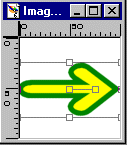
- Make any necessary adjustments to the size and placement of the arrow. Your image should look like the one shown here.
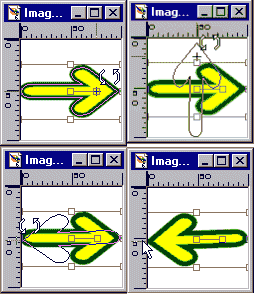
- Change the direction of the arrow by dragging the rotation handle, as shown here.
- Close the file. Save the file if you like.
File > Close
THE DRAW TOOL
You use the Draw tool to create Single Lines, Bezier Curves, Freehand Lines, and Point-to-Point Lines. There are a number of options available to you in the Tool Options dialog box.
Draw Tool Options
| |
| Create as Vector | Creates your drawing as a vectorobject (refer to the lecture on layers to learn more about vector objects). |
| Width | Determines the width of the line. |
| Close Path | Connects the end of the line with the beginning of the line. |
| Join | Determines the shape of the object's corners. A miter join produces pointed corners, a round joinproduces round corners, and a bevel join produces flat corners. |
| Single Line | Draws straight lines. You can draw a multi-segmented straight line by holding down the Alt key as you draw your line. To easily adjust the angle of your line at 45-degree increments, hold down the Shift key as you draw. To draw with the foreground color, hold down the left mouse button as you drag to draw. To draw with thebackground color, hold down the right mouse button as you drag to draw. |
| Bezier Curve Type | Enables you to draw smooth curves. The Bezier Curve drawing tool provides anchor points and controls to assist in the creation of curved lines. |
| Freehand Line | Enables you to draw as you drag the pointer. You can create any shape or design you desire. You left-click to draw with the foreground color and right-click to draw with the background color. |
| Point-to-Point Line | You create nodes as you draw. This lecture and the accompanying exercises do not cover Point-to-Point. |
Exercises:
Single Line:
The single-line option draws straight lines.
- Open a new file.
File > New
Settings:
Width: 100 Pixels
Height: 100 Pixels
Resolution: 72 Pixels/inch
Background Color: Black
Image Type: Grayscale (8 Bit)
- Set your foreground color to white.
Settings:
Red: 255
Green: 255
Blue: 255
- Select the Draw tool
 . Set the tool options.
Draw Tab Settings:
Type: Single Line
Style: Filled
Width: 5
Antialias: Yes
Create As Vector: No
Close Path: No
- Left-click and drag to create the design shown here.
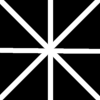
- Close the file. Save the file, if you like.
File > Close
Bezier Curve
- Open a new file.
File > New
Settings:
Width: 200 Pixels
Height: 200 Pixels
Resolution: 72 Pixels/inch
Background Color: Black
Image Type: Grayscale (8 Bit)
- Set your foreground color to white.
Settings:
Red: 255
Green: 255
Blue: 255
- Set the ruler to pixels.
File > Preferences > General Program Preferences > Rulers and Units
Display Units: Pixels
- Select the Draw tool. Set the tool options.
Draw Tab Settings:
Type: Bezier Curve
Style: Stroked
Width: 5
Antialias: Yes
Create As Vector: No
Close Path: No
Cursor and Tablet Options
Use Precise Cursors: Yes
Show Brush Outlines: Yes
- Draw a diagonal line across the image.
- Click at 150 pixels down and 50 pixels across.
- Click at 50 pixels down and 150 pixels across.
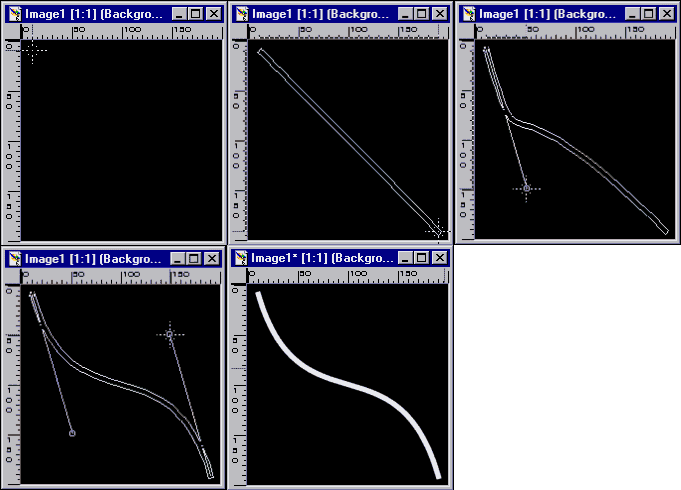
- Close the file. Save the file, if you like.
File > Close
Freehand Line
- Open a new file.
File > New
Settings:
Width: 200 Pixels
Height: 200 Pixels
Resolution: 72 Pixels/inch
Background Color: White
Image Type: 16.7 Million Colors (24 Bit)
- Set your foreground color to red.
Settings:
Red: 255
Green: 0
Blue: 0
- Set your background color to blue.
Settings:
Red: 0
Green: 0
Blue: 255
- Select the Flood Fill tool. Set the tool options.
Flood Fill Tab Settings:
Fill Style: Solid Color
Blend Mode: Normal
Paper Texture: Small Bricks
Match Mode: None
Opacity: 100
Sample Merged: No
- Flood Fill the image three times.
- Select the Draw tool.
Draw Tab Settings:
Type: Freehand Line
Style: Stroked
Width: 5
Antialias: Yes
Create As Vector: No
Close Path: No
- Right-click and draw the design shown in the image shown here.
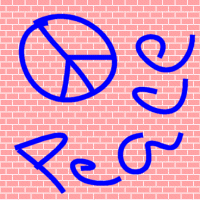
- Close the file. Save the file if you like.
No comments:
Post a Comment