THE PAINT BRUSH TOOL
You use the Paint Brush to paint on the canvas. It provides a variety of painting styles and brush tips. The exercises that follow illustrate some of the Paint Brush tool settings. The Airbrush works exactly like the Paint Brush; so we do not provide any Airbrush exercises.
Things You Need To Know:
Painting a Straight Line
When using any of the Paint Brush tools to paint a straight line:- Click where you want to begin the line.
- Hold down the Shift key.
- Click where you want to end the line.
Freehand Painting
When using any of the Paint Brush tools to paint freehand:
- Click where you want to begin painting. You left-click to apply the foreground color and right-click to apply the background color.
- Hold down the mouse button as you drag the pointer across the canvas.
The Tool Options Dialog Box
You use the Tool Options dialog box to set the tool options. To open the Tool Options dialog box, do either of the following:
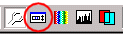
- Select your tool. Click on the Toggle Tool Options Window icon on the toolbar.
The Toggle Tool Options Window Icon
- Select your tool. Right-click on the Tool Palette toolbar to open a context menu. Select Tool Options from the context menu.
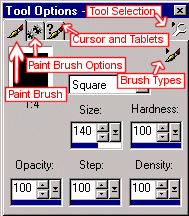
Tabs are named for the tool you're using. The Paint Brush tool has a Paint Brush tab and a Paint Brush Options tab. The Retouch Tool has a Retouch tab and a Retouch Options tab.
| Tool Selection icon | Click on the Tool Selection icon to select the tool with which you want to work. |
| Brush Types icon | Click on the Brush Types icon to select a type of brush. |
Exercises:
THE PAINT BRUSH
Brush Shape
The shape setting determines the shape of the tip of the brush. The following shapes are available: square, round, left slash, right slash, horizontal, and vertical.
Square Brush
The following exercise illustrates a square Paint Brush tip:
- Open a new file.
File > New
Settings:
Width: 100 pixels
Height: 100 pixels
Resolution: 72 Pixels/inch
Background Color: White
Image Type: 16.7 Million Colors
- Select the Paint Brush tool
 .
. - Click on the Toggle Tool Options Window icon
 to open the Tool Options dialog box.
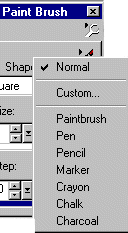
- Click on the Brush Types icon.

- Set the Brush type to normal:Paint Brush Tab Settings:
Paint Brush Type: Normal
- Set the remaining Paint Brush tab settings.
Shape: Square
Size: 50
Hardness: 100
Opacity: 100
Step: 100
Density: 100
- Click on the Paint Brush Options tab and set the Paint Brush Options settings.

Paint Brush Options
Paper Texture: None
Built Up Brush: Yes
- Set your foreground color to red. Left-click on the foreground color to open the Color dialog box. In the current color frame enter the values shown below; then click on OK.
Settings:
Red: 255
Green: 0
Blue: 0
- Click once in the center of the image. Your image should look like the one shown here.

- Close the image.
File > Close
Save your image if you like.
Round Brush
The following exercise illustrates a round paintbrush tip:
- Open a new file.
File > New
Settings:
Width: 100 pixels
Height: 100 pixels
Resolution: 72 pixels/inch
Background Color: White
Image Type: 16.7 Million Colors
- Select the Paint Brush tool. Set the tool options.
Paint Brush Tab Settings:
Paint Brush Type: Normal
Shape: Round
Size: 50
Hardness: 100
Opacity: 100
Step: 100
Density: 100
Paint Brush Options:
Paper Texture: None
Built Up Brush: Yes
- Set your foreground color to red.
Settings:
Red: 255
Green: 0
Blue: 0
- Click once in the center of the image.
- Your image should look like the one shown here.

- Close the image. Save your image if you like.
File> Close
Brush Size
Size determines the width and height of the brush in pixels. The following exercise illustrates paintbrush size.
- Open a new file.
File > New
Settings:
Width: 200 pixels
Height: 200 pixels
Resolution: 72 pixels/inch
Background Color: White
Image Type: 16.7 Million Colors
- Select the Paint Brush tool. Set the tool options.
Paint Brush Tab Settings:
Paint Brush Type: Normal
Shape: Square
Size: 50
Hardness: 100
Opacity: 100
Step: 100
Density: 100
Paint Brush Options:
Paper Texture: None
Built Up Brush: Yes
- Set your foreground color to red.
Settings:
Red: 255
Green: 0
Blue: 0
- Click once on the left side of the image. Your image should look like the one shown here.
- Reset the size of the Paint Brush tool. Do not change any of the other tool options.
Settings:
Size: 100
- Click once on the right side of your image.
- Your image should look like the one shown here.
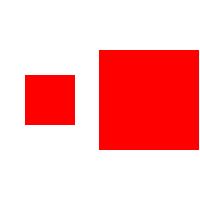
- Note the brush size difference.
- Close the image. Save your image if you like.
File> Close
Brush Hardness
The hardness setting controls the sharpness of the brush's edge. A setting of 100 produces a very sharp edge. A setting of 1 produces an extremely blurred edge. The following exercise illustrates the hardness setting.
- Open a new file
File > New
Settings:
Width: 200 Pixels
Height: 100 Pixels
Resolution: 72 Pixels/inch
Background Color: White
Image Type: 16.7 Million Colors
- Select the Paint Brush tool. Set the tool options.
Paint Brush Tab Settings:
Paint Brush Type: Normal
Shape: Square
Size: 50
Hardness: 10
Opacity: 100
Step: 100
Density: 100
Paint Brush Options:
Paper Texture: None
Built Up Brush: Yes
- Set your foreground color to red.
Settings:
Red: 255
Green: 0
Blue: 0
- Click once on the left side of the image. Your image should look like the one shown here.

- Reset the hardness of the Paint Brush tool. Do not change any of the other options.
Settings:
Hardness: 100
- Click once on the right side of your image.
- Your image should look like the one shown here. Note the effect of changing the hardness.

- Close the image. Save your image if you like.
File> Close
THE PAINT BRUSH -- PART TWO
Opacity
Opacity determines transparency of the paint. A setting of 1makes the paint almost completely transparent. A setting of100 makes the paint opaque. The following exercise illustrates the opacity setting.
- Open a new file.
File > New
Settings:
Width: 200 Pixels
Height: 100 Pixels
Resolution: 72 Pixels/inch
Background Color: White
Image Type: 16.7 Million Colors
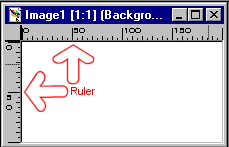
- Set your ruler to display in pixels.
File > Preferences > General Program Preferences > Rulers and Units
Ruler Frame Settings:
Display Units: Pixels
- Make sure the ruler is turned on.
View > Rulers
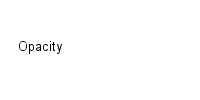
- Select the Text tool
 .
. - Place the pointer at 50 pixels across and 50 pixels down.
- Click on the image to open the Text Entry dialog box. Set the tool options.
Settings:
Name: Arial
Size: 10
Script: Western
Create As: Floating
Antialias: Yes
Text Color: Black (Click on the color box to select a color.)
Kerning: 0
Leading: 0
Auto Kern: Yes
Center
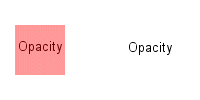
Enter Text Here: Opacity
- Remove the Selection.
Selections > Select None
- Your image should look like the one shown here.
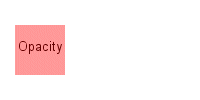
- Select the Paint Brush tool. Set the tool options.
Paint Brush Tab Settings:
Paint Brush Type: Normal
Shape: Square
Size: 50
Hardness: 100
Opacity: 40
Step: 100
Density: 100
Paint Brush Options
Paper Texture: None
Built Up Brush: Yes
Cursor and Tablets
Use Precise Cursor: Yes
Show Brush Outlines: Yes
- Set your foreground color to red.
Settings:
Red: 255
Green: 0
Blue: 0
- Click once, right on top of the word "opacity." Your image should look like the one shown here.
- Select the Text tool.
- Place the pointer at 150 pixels across and 50 pixels down.
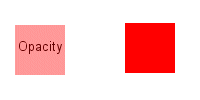
- Click on the image to open the Text Entry dialog box. You want to place the word "opacity" on your image again. You do not need to adjust your settings. Click on OK to close the Text Entry dialog box. Your image should now look like the one shown here.
- Remove the selection.
Selection > Selection None
- Select the Paint Brush tool. Reset the opacity of the Paint Brush tool. Do not change any of the other settings.
Settings:
Opacity: 100
- Click once, right on top of your second entry of the word "opacity."
- Your image should now look like the one shown here. Note the effect of changing the opacity setting.
- Close the image. Save your image if you like.
File> Close
Step
Step controls when paint hits the canvas as you drag the brush across the canvas. The following exercise illustrates the step setting.
- Open a new file
File > New
Settings:
Width: 200 Pixels
Height: 200 Pixels
Resolution: 72 Pixels/inch
Background Color: White
Image Type: 16.7 Million Colors
- Select the Paint Brush tool. Set the tool options.
Paint Brush Tab Settings:
Paint Brush Type: Normal
Shape: Round
Size: 50
Hardness: 100
Opacity: 60
Step: 50
Density: 100
Paint Brush Options
Paper Texture: None
Built Up Brush: Yes
- Set your foreground color to red.
Settings:
Red: 255
Green: 0
Blue: 0
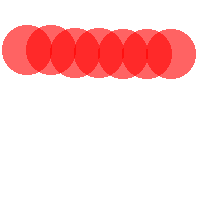
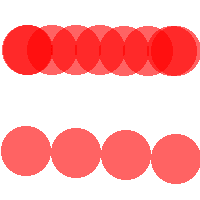
- Drag your pointer from left to right across the top of your image. Your image should look like the one shown here.
- Reset the step of the Paint Brush tool. Do not change any of the other settings.
Settings:
Step: 100
- Drag your pointer from left to right across the bottom of your image.
- Your image should look like the one shown here. Note the effect of changing the step setting.
- Close the image. Save your image if you like.
File> Close
Density
The Density setting controls the concentration of the paint when the brush hits the canvas. A density of 100 produces a high concentration of paint. A density of 1 produces speckles of paint. The following exercise illustrates the density setting.
- Open a new file
File > New
Settings:
Width: 200 Pixels
Height: 100 Pixels
Resolution: 72 Pixels/inch
Background Color: White
Image Type: 16.7 Million Colors
- Select the Paint Brush tool. Set the tool options.
Paint Brush Tab Settings:
Paint Brush Type: Normal
Shape: Square
Size: 50
Hardness: 100
Opacity: 100
Step: 100
Density: 20
Paint Brush Options:
Paper Texture: None
Built Up Brush: Yes
- Set your foreground color to red.
Settings:
Red: 255
Green: 0
Blue: 0
- Click once on the left side of the image. Your image should look like the one shown here.

- Reset the density of the Paint Brush tool. Do not change any of the other settings.
Settings:
Density: 100
- Click once on the right side of your image.
- Your image should look like the one shown here. Note the effect of changing the density setting.

- Close the image. Save your image if you like.
File> Close
Paper Texture
With Paint Shop Pro, you can paint using a variety of paper textures. Use paper texture to change the look or motif of the color you apply. Paint Shop Pro provides a long list of paper textures. The following exercise illustrates two of them. You should experiment with all of them.
- Open a new file
File > New
Settings:
Width: 200 Pixels
Height: 100 Pixels
Resolution: 72 Pixels/inch
Background Color: White
Image Type: 16.7 Million Colors
- Select the Paint Brush tool. Set the tool options.
Paint Brush Tab Settings:
Paint Brush Type: Normal
Shape: Square
Size: 100
Hardness: 100
Opacity: 100
Step: 100
Density: 100
Paint Brush Options:
Paper Texture: Squares
Built Up Brush: Yes
- Set your foreground color to red.
Settings:
Red: 255
Green: 0
Blue: 0
- Click once on the left side of the image. Your image should look like the one shown here.

- Reset the paper texture of the Paint Brush tool. Do not change any of the other settings.
Settings:
Paper Texture: Polka Dot
- Click once on the right side of your image.
- Your image should look like the one shown here.
- Close the image. Save your image if you like.
File> Close
Custom Brushes
In addition to the paintbrush tips listed in the Shape field, Paint Shop Pro provides several custom brushes. And, you can create your own custom brush. The following exercise illustrates how to use a custom brush.
- Open a new file
File > New
Settings:
Width: 200 Pixels
Height: 100 Pixels
Resolution: 72 Pixels/inch
Background Color: White
Image Type: 16.7 Million Colors
- Select the Paint Brush tool. If it is not already open, open the Tool Options dialog box.
- Click on the Brush Types icon. A drop-down menu will appear. Select Custom.
- The Custom Brush dialog box will open. Select the Star and click on OK.
- Set the remaining tool options.
Paint Brush Tab Settings:
Opacity: 100
Step: 100
Paint Brush Options
Paper Texture: None
Built Up Brush: Yes
- Set your foreground color to blue.
Settings:
Red: 0
Green: 0
Blue: 255
- Set your background color to red.
Settings:
Red: 255
Green: 0
Blue: 0
- Create an image like the one shown below. Left-click to paint the blue stars. Right-click to paint the red star.

- Close the image. Save your file if you like.
File> Close
No comments:
Post a Comment