Lesson 6: Creating Forms
Access forms are much like paper forms: you can use them to enter, edit, or display Data. They are based on tables. When using a form, you can choose the format, the arrangement, and which fields you want to display. This lesson teaches you how to create forms.
- Using the Form Button
- Create a Split Form
- Create a Multiple Items Form
- Modify a FormAccess forms are much like paper forms: you can use them to enter, edit, or display data. They are based on tables. When using a form, you can choose the format, the arrangement, and which fields you want to display. This lesson teaches you how to create forms.
Using the Form Button
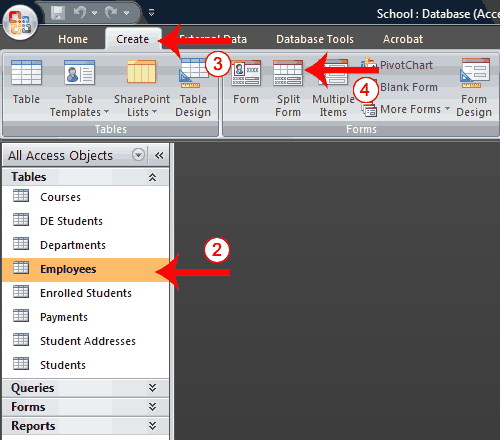
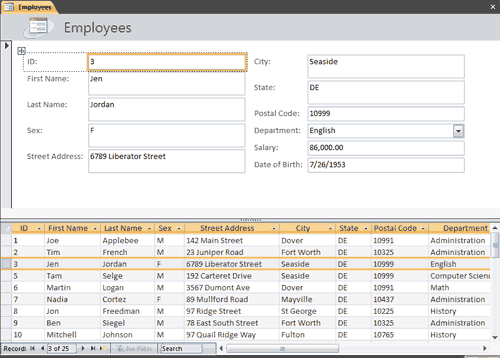
Access can automatically create several types of forms. For example, when you click the Form button on the Create tab, Access places all fields in the selected table on a form. If the table has a one-to-many relationship with one other table or query, Access creates a stacked form (the records are displayed in a column) for the primary table and a datasheet for the related table. If there are several tables with a one-to-many relationship, Access does not create the datasheet.To create a form:
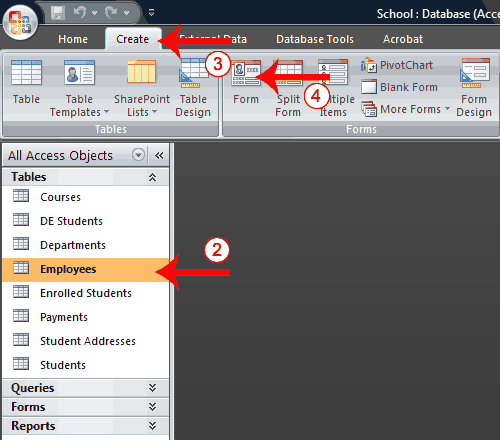
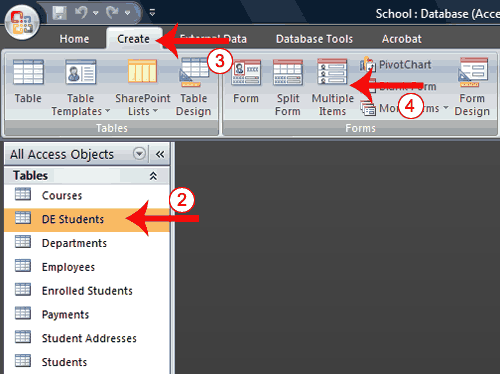
- Open the Navigation pane.
- Click the table or query on which you want to base your form.
- Activate the Create tab.
- Click Form in the Forms group. Access creates a form.
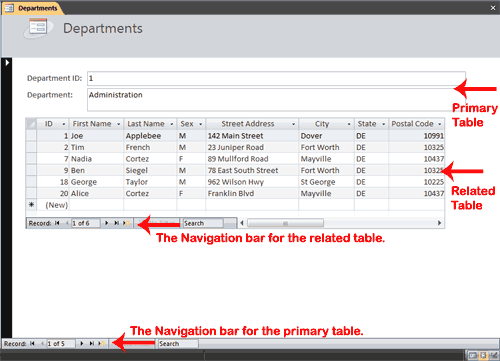 You can use the Navigation bars to move through the records on a form.
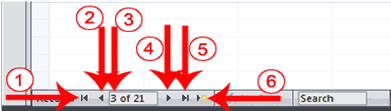
1 Go to First Record 2 Go to Previous Record 3 The Current Record 4 Go to Next Record 5 Go to Last Record 6 Create a New (Blank) Record  Tip: After you create a form, you can save it. You can open a saved form at any time.
- Click the Save button on the Quick Access toolbar. Access saves the form unless you are saving for the first time. If you are saving for the first time, the Save As dialog box appears.
- Type the name you want to give the form.
- Click OK. Access saves the form. You can now access the form by using the Navigation pane.
You can also save by right-clicking a form’s tab and then selecting Save from the menu that appears. Access saves the form unless you are saving for the first time. If you are saving for the first time, the Save As dialog box appears. Type the name you want to give the form and then click OK. Access saves the form. You can now access the form by using the Navigation pane.Create a Split Form
A split form is a form in which the same data is displayed in two views simultaneously. One part of the form displaysi n Form view (stacked fields), while the other part displays in Datasheet view. The two views are synchronized, so as you select a field in one view, it is automatically selected in the other view. You can add, change, or delete the data in either view. Using a split form gives you the benefits of two types of forms in a single form. For example, you can use the datasheet portion to locate records and the form portion to edit records.To create a split form:
- Open the Navigation pane.
- Click the table or query on which you want to base your form.
- Activate the Create tab.
- Click Split Form in the Forms group. Access creates a split form.
Create a Multiple Items Form
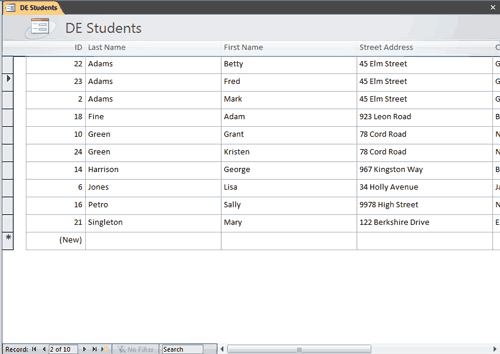
You can use the Multiple Items button on the Forms tab to create a form that displays multiple records, one record per row.To create a multiple items form:
- Open the Navigation pane.
- Click the table or query on which you want to base your form.
- Activate the Create tab.
- Click Multiple Items in the Forms group. Access creates a multiple items form.
 Tip: A view is a way of looking at an Access object. Forms have three views: Form view, Layout view, and Design view. You can enter, edit, and view data in Form view. You can modify a form in Layout view or Design view. In Layout view, you can see your data, and the form you see closely resembles what your form will look like when you view it in Form view. You can make most, but not all, changes to your form in Layout view. Design view displays the structure of your form. In this view you cannot see the underlying data, but you can perform some tasks in Design view that you cannot perform in Layout view. This tutorial focuses on Layout view.
To change the view:
- Open the form.
- Activate the Format tab.
- Click the down-arrow under the View button. A menu appears.
- Click the view you want.
Modify a Form
After you create a form, it opens in Layout view, where you can modify it.To change the size of a field:
- Click a side of the field and drag to change the width of the field.
- Click the top or bottom of a field and drag to change the height of a field.
To move a datasheet:
- Click the datasheet to select it.
- Click and drag the four-sided arrow in the upper-right corner to move the datasheet.
To resize a datasheet:
- Click the datasheet to select it.
- Click a side of the datasheet and drag to change the width.
- Click the top or bottom of the datasheet and drag to change the height.
To apply an AutoFormat:
The AutoFormat option on the Format tab enables you to apply formats quickly, such as background colors, field colors, field label colors, and fonts.- Activate the Format tab.
- Click AutoFormat. The AutoFormat menu appears.
- Click the format you want to apply.
To change a form title:
When you create a form, by default, Access uses the form name as the title. You can change the title.- Activate the Format tab.
- Click the Title button.
- Type the new title.
To add the date and time:
You can easily add the date and time to your form.- Activate the Format tab.
- Click the Date and Time button. The Date and Time dialog box appears. Select the date and time format you want. The date and time appear on your form.
Change Fonts and FormatsYou can use options on the Format tab to manually apply individual formats to your report. However, before you can apply a format to a field or field label, you must select it. To select a field or field label, click it. To select multiple items, hold down the Shift key and then click each item you want to select. A box surrounds selected items.Change Fonts and Formats Button Shortcut Key Function Layout View—Format Tab, Font Group 
Apply a font to the current selection. 
Set the size of the font for the current selection. 
Ctrl-b Bold the current selection. 
Ctrl-i Italicize the current selection. 
Ctrl-u Underline the current selection. 
Ctrl-l Left-align the selection. 

Ctrl-r Right-align the selection. 
Ctrl-e Center the selection. 
Change the font color. 
Change the background color. 
Change the alternating color. For example, you can have every other row on a datasheet appear in an alternating color. Layout View—Format Tab, Formatting Group 
Apply a Number format. 
Use a currency symbol. 
Change to percent. 

Use thousand separators. 
Increase decimal places. 
Decrease decimal places. Layout View—Format Tab, Gridlines Group 
Add gridlines. 
Change the weight of gridlines. 
Change the style of gridlines. 
Change the color of gridlines. Layout View—Format Tab, Controls Group 
Add a logo. 
Add or change a title. 
Add a date and time. Set line thickness. 
Set line style. Set line color.
No comments:
Post a Comment